Calum Kenny (UK/Hong Kong) and I climbed the North Ridge of Vallunaraju in Peru’s Cordillera Blanca on July 10, 2024. We successfully completed the route, although we found it in much harder condition than reported in many sources. We carried our camp up and over and descended the standard route to moraine camp, and then the Llaca refuge.
My season in Huaraz had started slow; a couple weeks with no summits. Calum, a friend and frequent climbing partner in Colorado, joined the trip late, and I was glad to see him arrive in Huaraz. After a week spent recovering from sickness and acclimatizing to the altitude, he and I set our sights on our first climb.
“I dunno man, I just feel good about Vallu. Something is calling me to it.” Calum tells me, several times. Vallunaraju is a very popular guided mountain, so I’d heard plenty about it, but never been up myself. Sure, I say. Why not?
We have Brad Johnson’s Classic Climbs of the Cordillera Blanca in front of us. This is a very good book, but 20 years out of date. We read his route description of Vallunaraju. For some reason he has not included the very popular standard route, which is a walk, but instead only lists the North Ridge.
Brad Johnson’s Top Line:
“The North Ridge of Vallunaraju is an enjoyable, moderately easy mountaineering adventure. The approach is the hardest part. The climbing is straightforward and rewarding, with lots of sun and great views.” Grade: AD-
My Top Line:
An enjoyable tour, the North Ridge of Vallunaraju is a unique way to experience this popular mountain without crowds. You’ll need to be a competent mixed climber, as well as fit and capable of carrying your camp up and over the mountain, since descending from the North Ridge could prove quite challenging in thin conditions. The gully is steep, chossy, and the S-facing aspect means the snow is generally unconsolidated and difficult to anchor rappel pickets. You’ll be happy to follow the tourist trail down the other side of the mountain, instead of reversing the brutal approach over endless scree and talus. I suggest a grade of TD-; AI4 / M4 R70 deg max
Approaching Vallunaraju North Ridge:
Excerpt of map from Brad Johnson’s Classic Climbs of the Cordillera Blanca, p. 169
The approach is indeed difficult, although the climbing in dry conditions is equally challenging. Be prepared for a tough journey.
Vallunaraju is accessed from the Quebrada Llaca, a valley which lies directly above Huaraz and benefits from a road which takes you directly to the Refugio Llaca, owned and operated by the AGMP (Associacion de Guias de Montaña del Peru). A taxi from Huaraz will cost 130 soles, one-way, at official rates. We arranged a driver through the Casa de Guias, who took us promptly and professionally to the refuge.
We left Huaraz at 7:15 a.m. and arrived at the refuge around 8:30. After an impromptu interview with Latina Noticias, which happened to be filming a feature up in the valley, we were on our way.
The approach starts on the standard trail for Vallunaraju, a couple hundred meters down the road from the Llaca refuge – it’s a set of stone stairs, skier’s right. Hard to miss. The trail starts steep, gaining elevation quickly through a set of steep switchbacks for a mile or so. Where the trail crosses rock, look for white paint splotches or the iron posts which are sometimes used to anchor a fixed line (currently no fixed lines). The trail is straightforward to follow. Eventually you will exit the steep climbing and reach a point where the trail starts heading left, at a gradual traverse across the mountain. That is the trail to moraine camp of the standard route – here those headed for the North Ridge of Vallunaraju or to climb on the face of Ocshapalca must head RIGHT. There is no trail.
Suffer across the mountainside, negotiating talus, brush, and scree. You may find a few cairns along your way, but the path is obvious regardless: make your way towards the large “V”-notch in the SE ridge of Vallunaraju. If you go high, there are a few small glacial tarns and streams from which to refill your water, but you will have to go up and down over several unnecessary ridges. If you stay low, your path will be more direct, but you may not be able to refill water.
Pass through ridge here
Pass through the V-notch on steep scree (helmets advisable). This should be passable even if there is fresh snow. Once atop the notch, your path to Vallunaraju or Ocshapalca should be clear and visible. You will also be able to assess to conditions on rock wall barring access to the North Ridge. The traditional way to gain the ridge is the left-most snow patch, which has become completely separated from the main glacier. This was the route we chose, although other options existed.
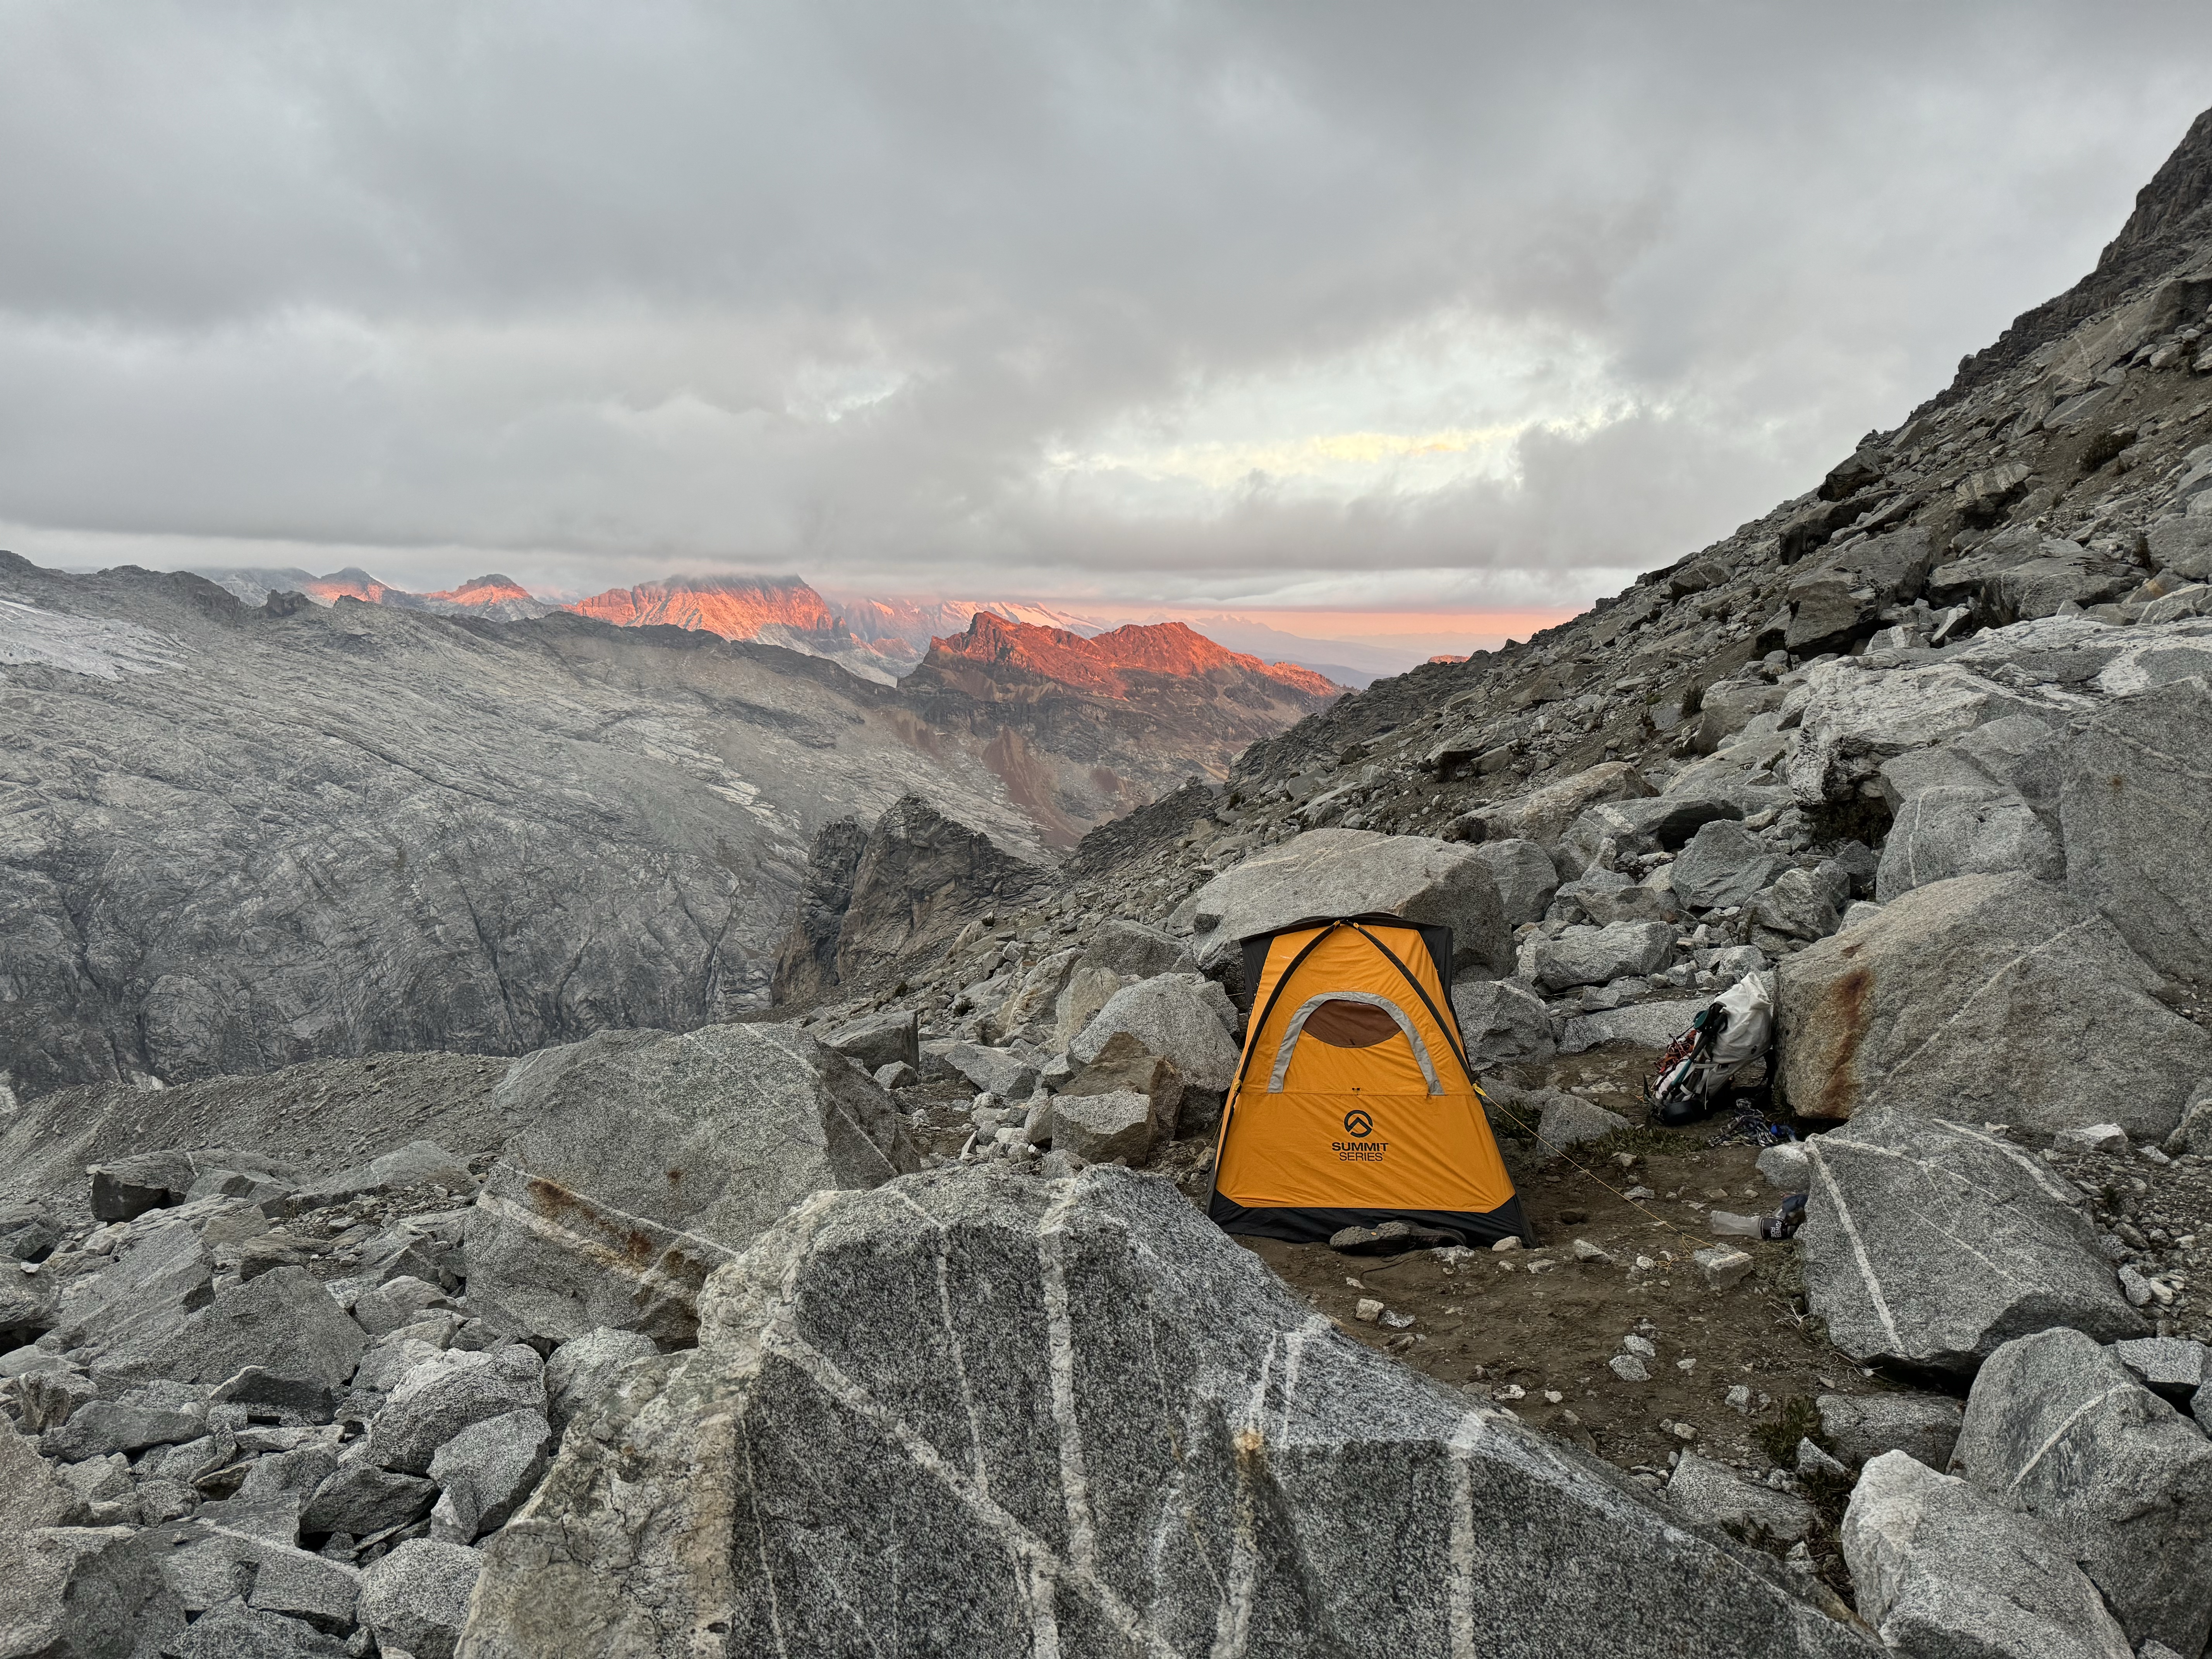
From the col, head left and down along the most reasonable line of weakness. You may find something resembling a path here. Camp for the North Ridge of Vallunaraju can be made near the slabs at the base of the glacier. We landscaped a nice flat campsite on the earth at (-9.41851,-77.45342). A two-person tent fit here; with the addition of a large cairn and a more serious rock wall, this could become quite a nice campsite, close to the glacier for melting snow.
It was beginning to snow on us, so we boiled up some ramen and got into our sleeping bags early, our alarms set for 3:30 a.m.
The Climb
We spent a sleepless night in the tent. It wasn’t too cold, but graupel snow fell on us for most of the night. The forecast hadn’t called for snow, and we worried it might coat the rock on the route, making the mixed sections harder to decipher. Calum, still acclimatizing, was having trouble breathing. In that netherworld between waking and trance; our night passed quickly; interminably.
The alarms sounded at 3:30, both of us relieved that we didn’t need to try and sleep any more. Although we had ambitions of being up and off the technical terrain before the dawn, our ambition did not match our ability. We passed a slow madrugada, eating oatmeal and packing up our camp at an unhurried pace. Since we had brought only one 70-meter rope with us, and descent down the gully looked to require a number of rappels, we decided to carry our camp up and over. This would add significant weight to our backs, but would allow us to descend the standard route down the SW glacier to moraine camp and hike the trail out – much easier terrain than we had taken in.
Fresh snow around our tent footprint
With our sleeping bags, pads, and tent on our backs, we began the short approach up to the snow gully. It was fairly straightforward, with a couple exposed rock moves to gain snow-covered slabs. Lots of loose scree where glacier had once existed made upward progress a little questionable, but not impossible. The ground finally became frozen about 50 meters below the start of the technical climbing, so we threw on our crampons and continued.
We racked up at a small alcove at the bottom-left of the snow gully – a short discussion ensued over whether you could call this a “bivvy cave” or not. It was slanted and small, but very well-sheltered. In the end we decided most people would prefer to sleep on the slabs below. Not a bivvy cave.
Calum took the first lead and scootered off, warming rapidly in the pre-dawn. He took the lead about 120 meters up easy snow and moderate mixed (M2-M3). I followed along behind him on simulclimb. I was heartened to note that very little was falling down the gully – I had been concerned that in its melted state, it might drop rocks. Calum set belay on the left wall of the gully, at a point right before it turned to the right a little bit.
Moderate mixed at the start of the gully
I reached the belay, recollected what little gear Calum had on his harness, and set off up my pitch. It began with very thin, unprotectable ice up a slab. I swung at it gently, seeing what would happen. The couple centimeters of ice shattered, revealing frozen kitty-litter ground underneath. I swung again, to see if the pick would penetrate the ground. It did, a little bit. Not easily.
First belay- you can see the snow and ice getting thin
We had no stubby ice screws on the rack, not that the ice was even remotely thick enough to use one of those. Rock pro was nonexistent in this spot, and there wasn’t enough snow to use a picket. I looked around the corner briefly, but wasn’t impressed with what I saw out there. Up the ramp, I resolved. It would be spicy, but I knew how to climb thin ice. Delicately, with precision and confidence. Tap only as much as needed for purchase, no more. Respectfully ask for passage; a slow dance with the medium. I took a few steps up, and then a few more. Settling my weight back on my heels, my secondary points engaged and my crampons kept me on the slab. I was in.
After five meters or so of methodical progress and controlled breathing, I reached a rock buttress where I pounded a piton. The rock all along the wall was fractured, so it didn’t inspire total confidence – but it was much better than nothing. Here I took a brief video – basically the only documentation we have of the difficult technical climbing. Soon after I traversed out right to grab a snow slope – thin coverage and difficult to protect, but enough to climb and safer than the smooth slabs to the left.
Terrain steepening at the piton placement.
Calum called out to me. “What?!” I yelled. “WHAT?!” He yelled back. “What?!?” I said in response.
We were both out of breath. I resolved to continue; he would manage his problem without my input, and I had to manage mine. My difficulties were bastantes: poor protection and difficult mixed climbing as far as I could see. It wasn’t insane climbing – never too vertical, but certainly challenging. Loose snow on rock slabs-just like winter climbing in Rocky Mountain National Park, back home. Already we were in terrain much harder than the AD- described in Brad Johnson’s guidebook. Up I went, working the easiest line of weakness between snow, thin ice, frozen scree, and exposed rock.
I started into a chossy mixed traverse, comprised of many large blocks stacked together. I dislodged a few small ones into the gully to my right; I felt fine about it, knowing Calum’s belay was tucked away in a safe place to the left. I chocked my ice tools tools sideways into a crack and the top boulder shifted significantly. Yikes. I carefully removed my tool, set the other one as well as I could, and tipped the boulder out into the void.
It fell far enough to make me imagine myself doing the same. Deep breath; find a place in the stacked choss for a cam; make sure it’s not moving; and around the corner. So goes the pitch. I hear an exclamation or two from Calum below, and I know I am moving slow, but I’m fighting for my life.
I find a decent belay stance in the left corner of the gully, with enough snow on the rocks to hold my feet. The only problem is all the rock in front of me is shattered—unreliable for protection. With the very real possibility that Calum could fall off the pitch below, I spend a long time constructing a five-point anchor, involving two cams, a piton, a nut, and a slung choke. My harness is completely empty – we’ve spent the entire rack. But we’re safe. Unless he falls, swings, and the single half-rope we’re climbing on is shredded on a sharp rock. But he’s a veteran of Scottish winter. He won’t fall, I know; and he doesn’t.
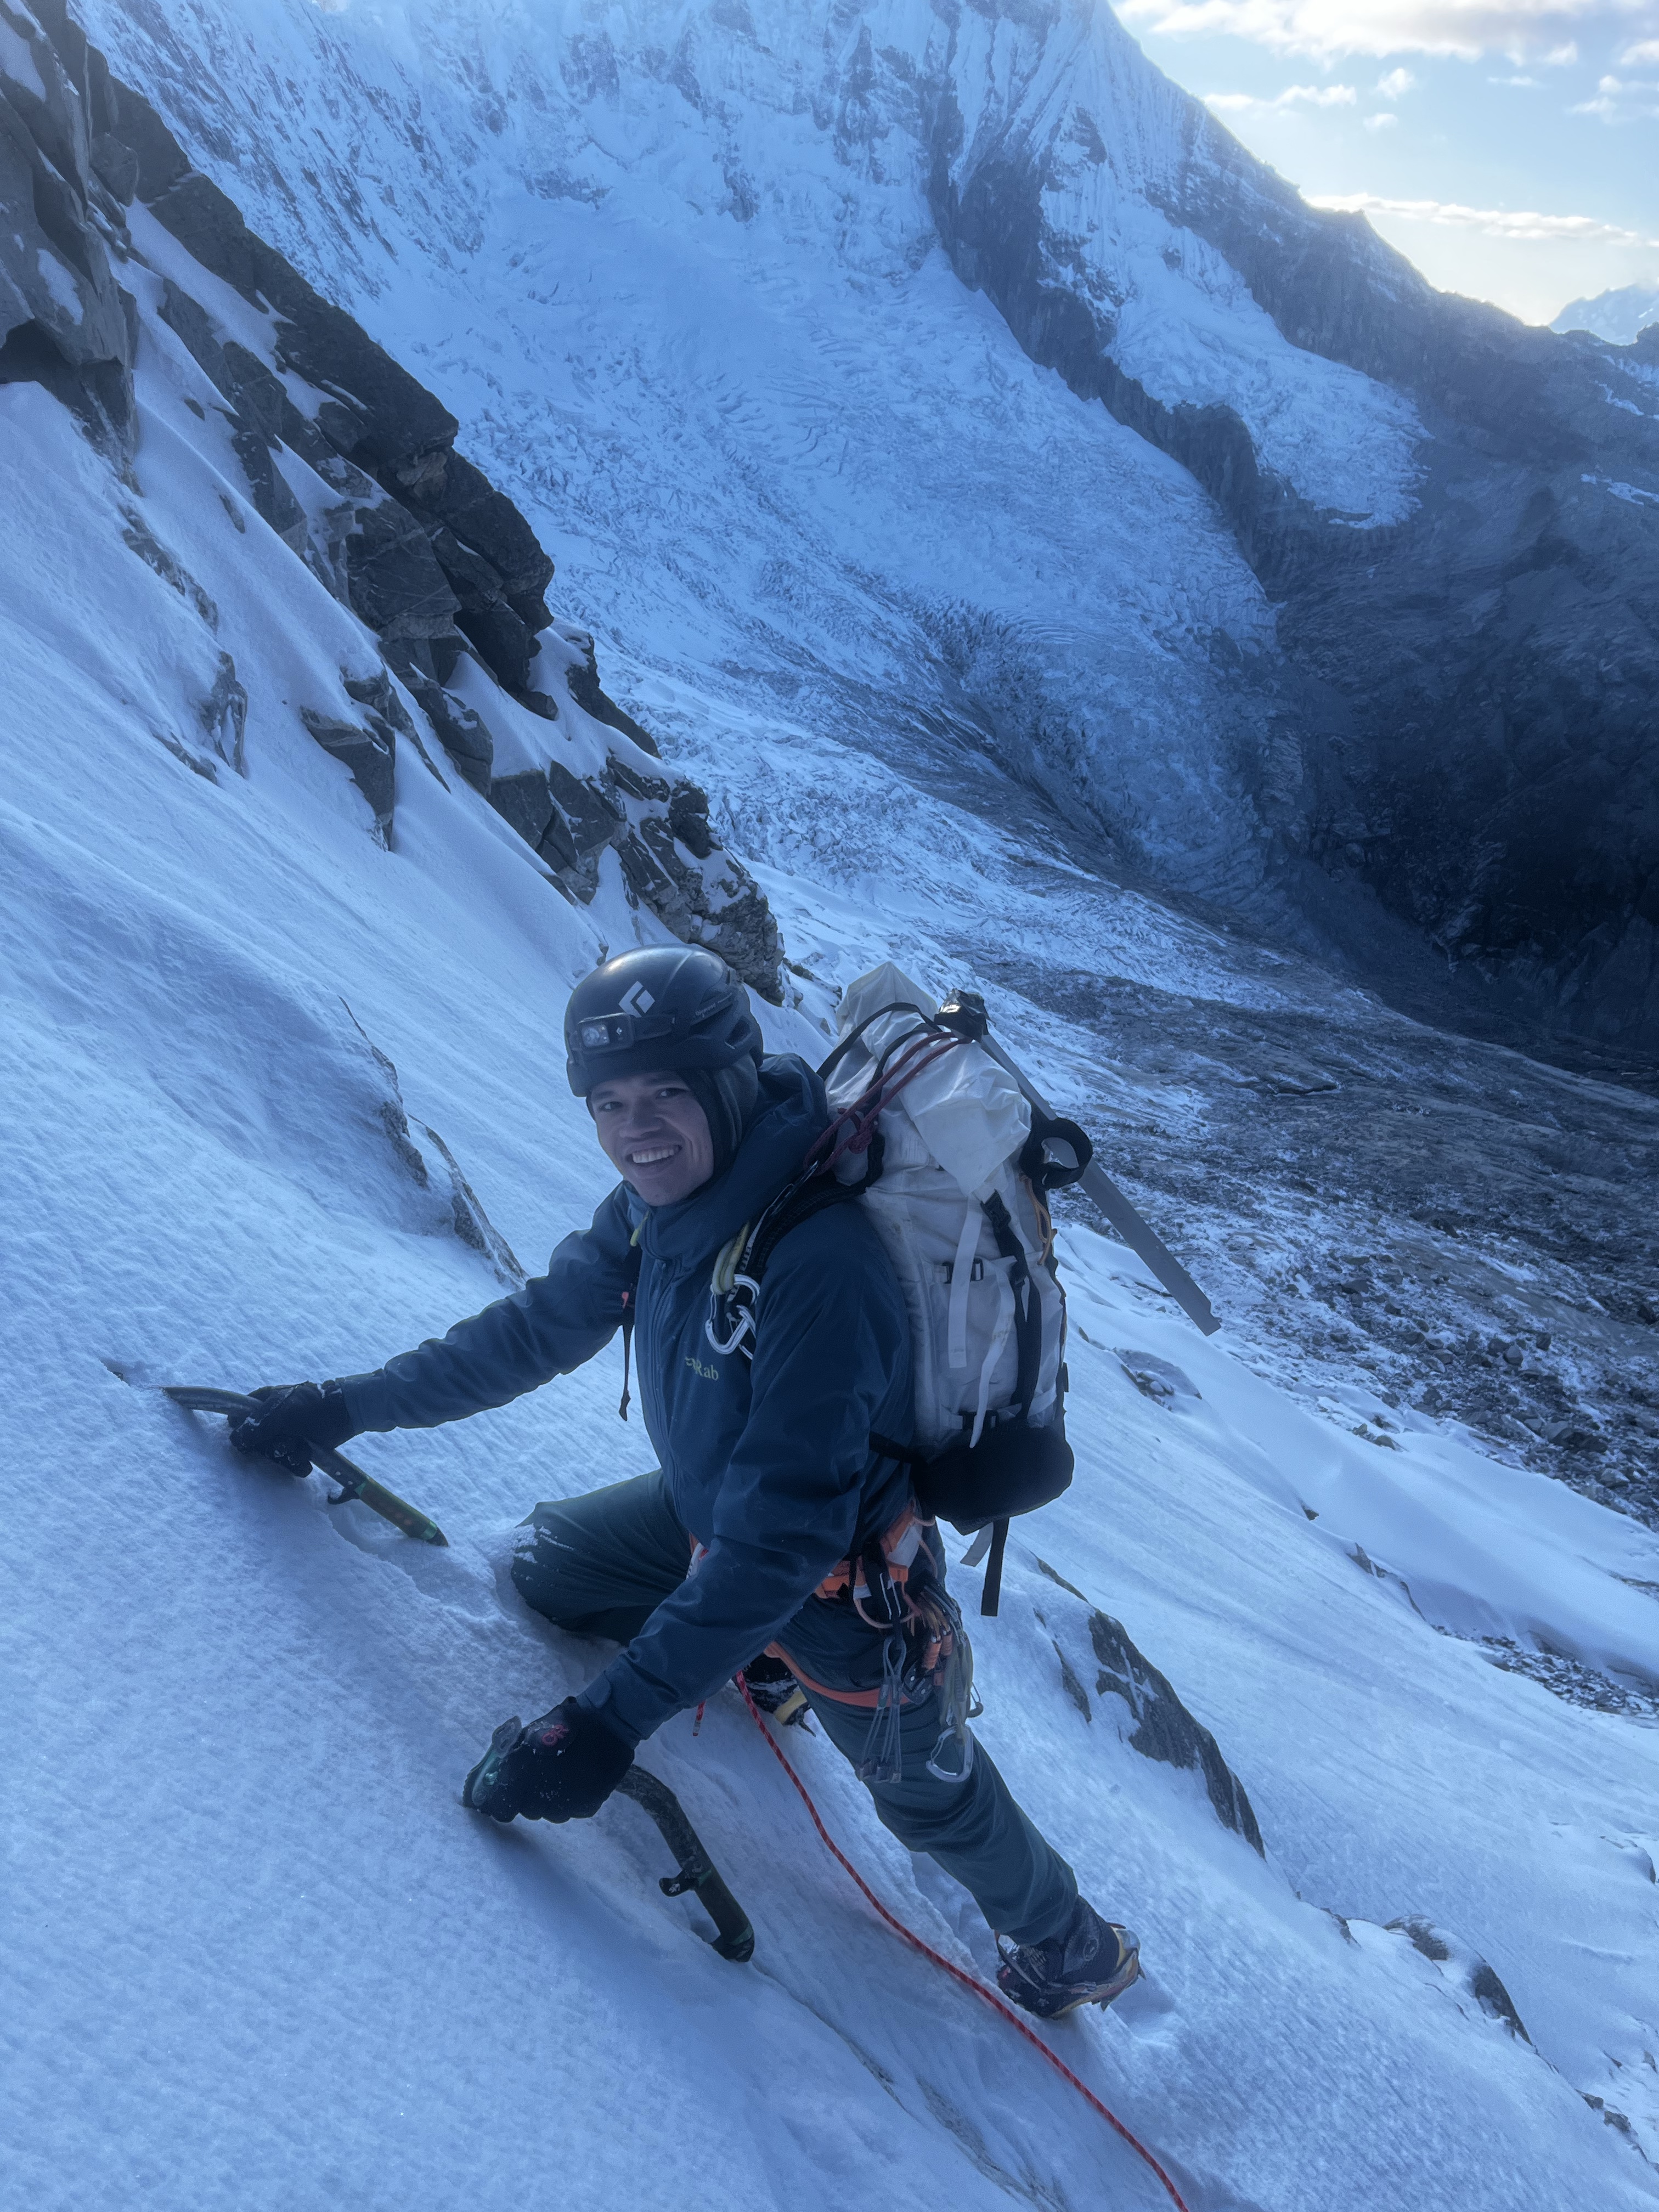
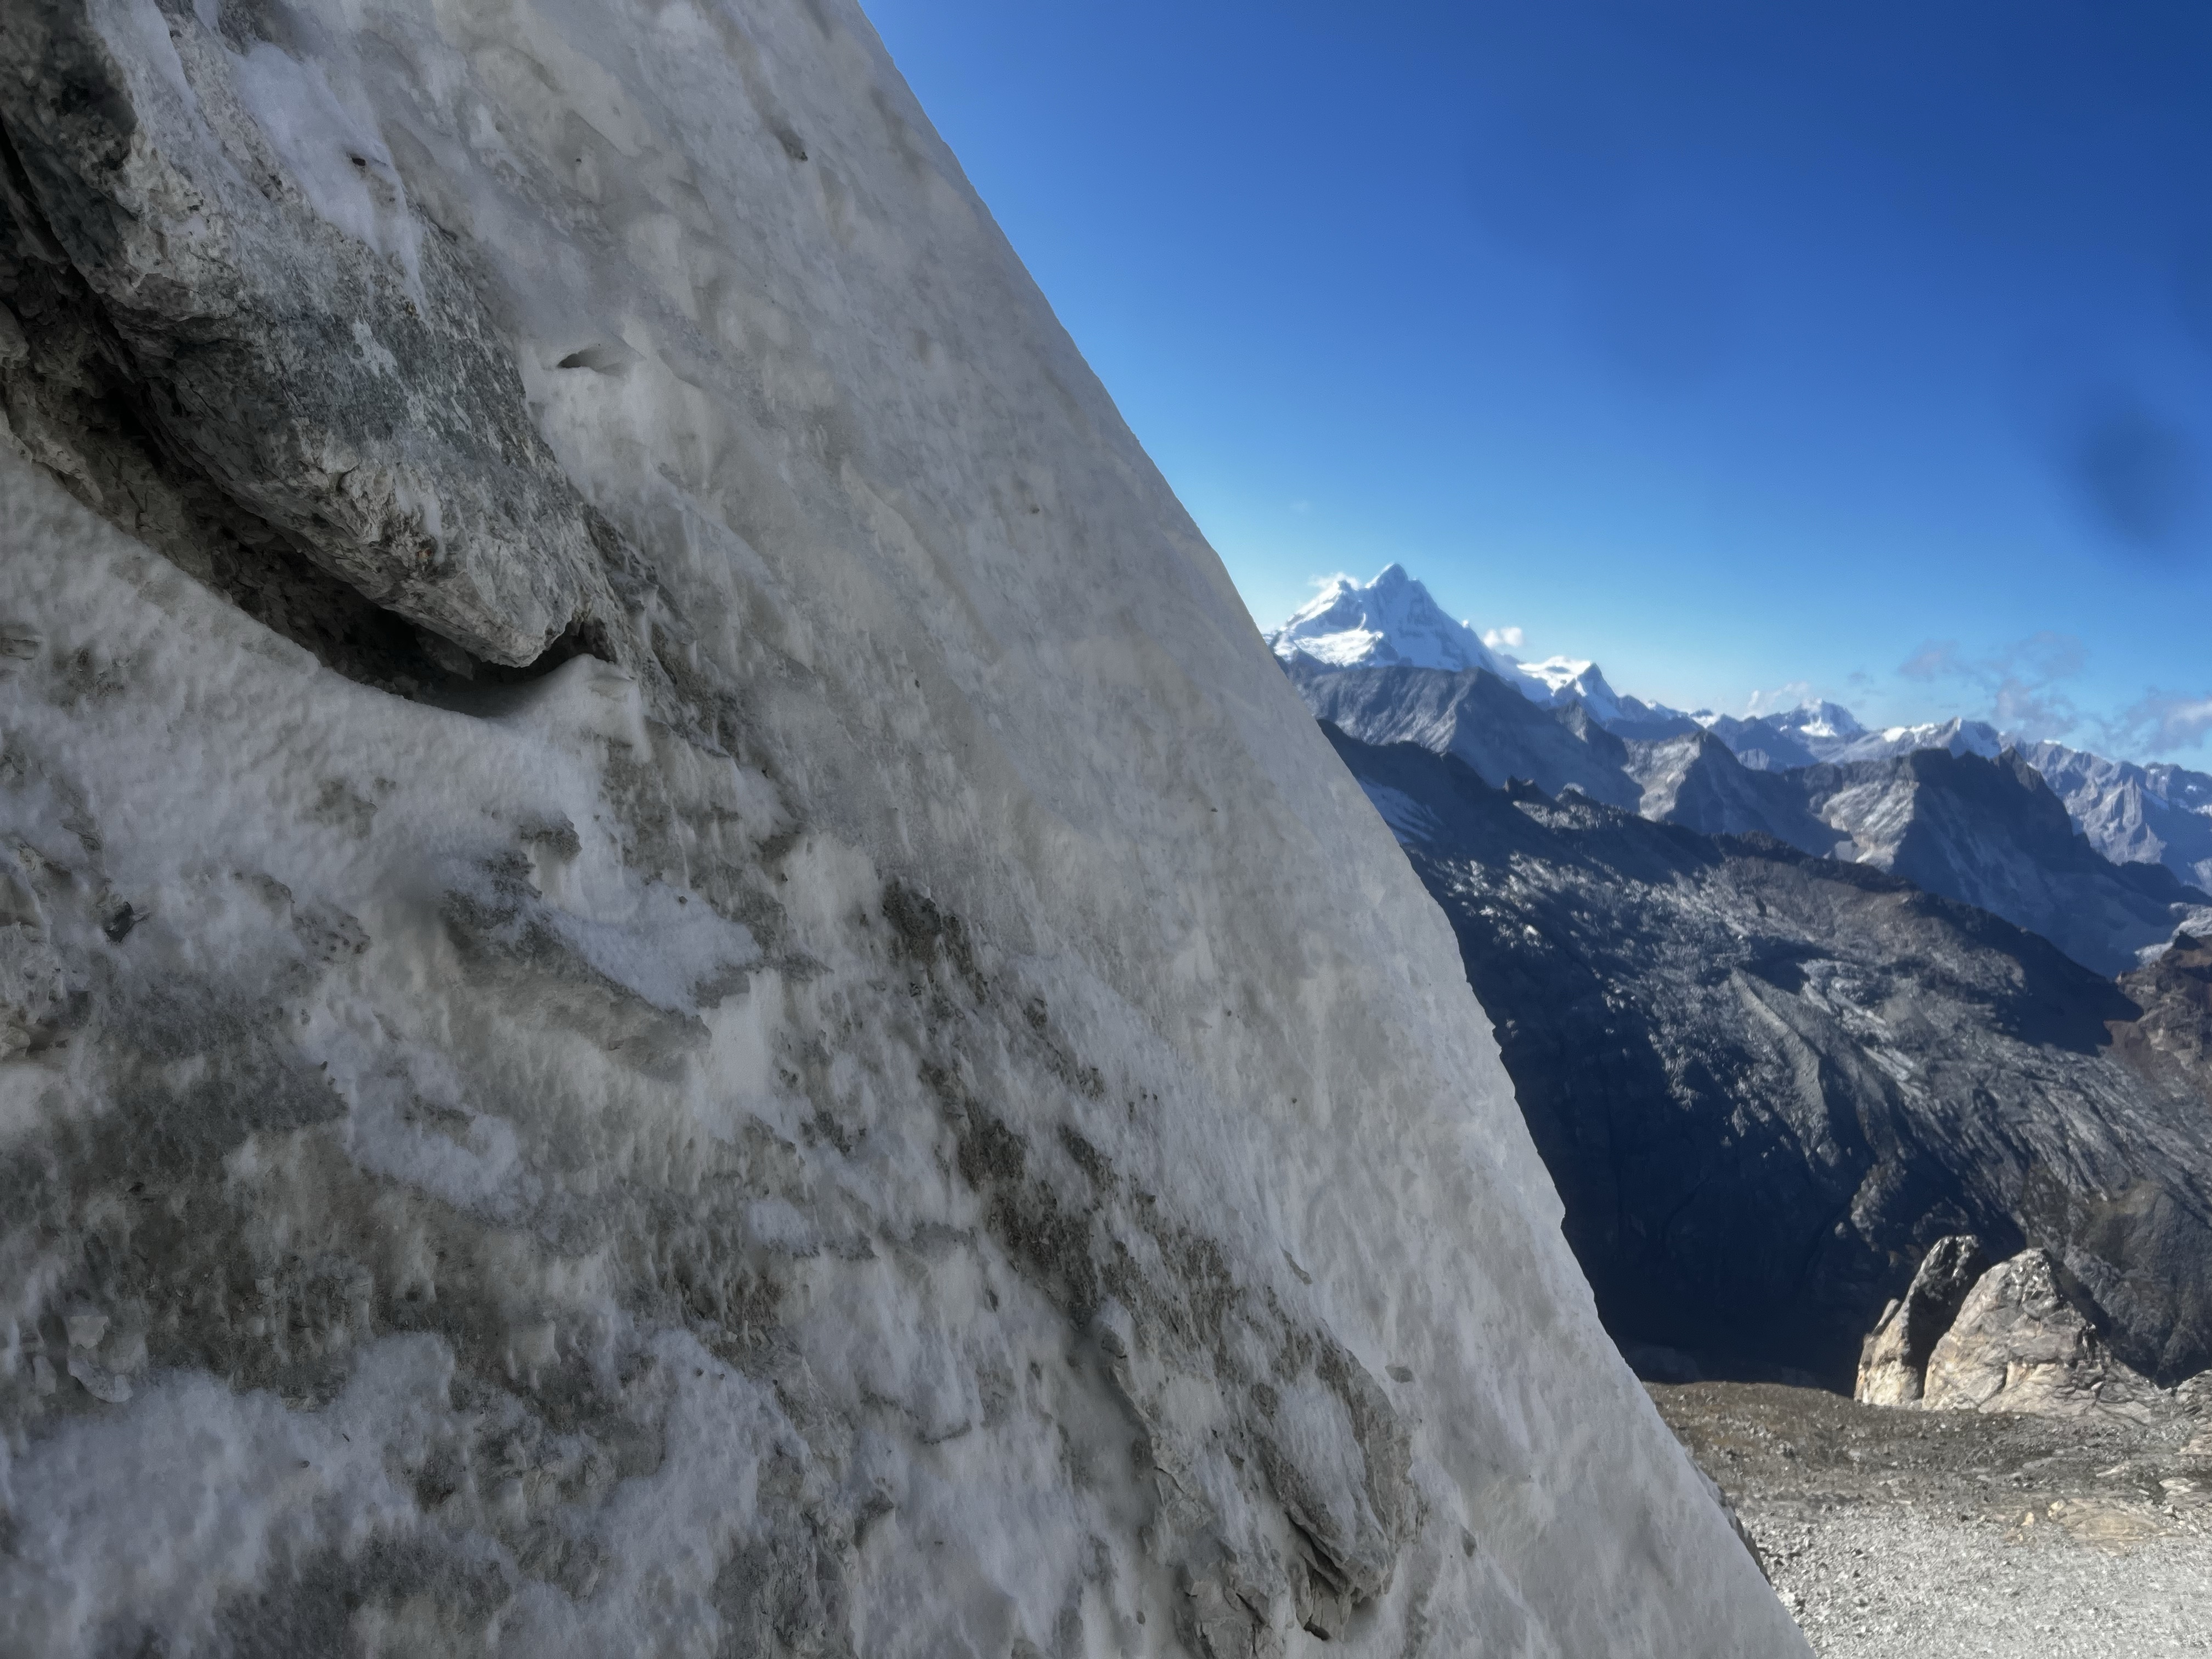
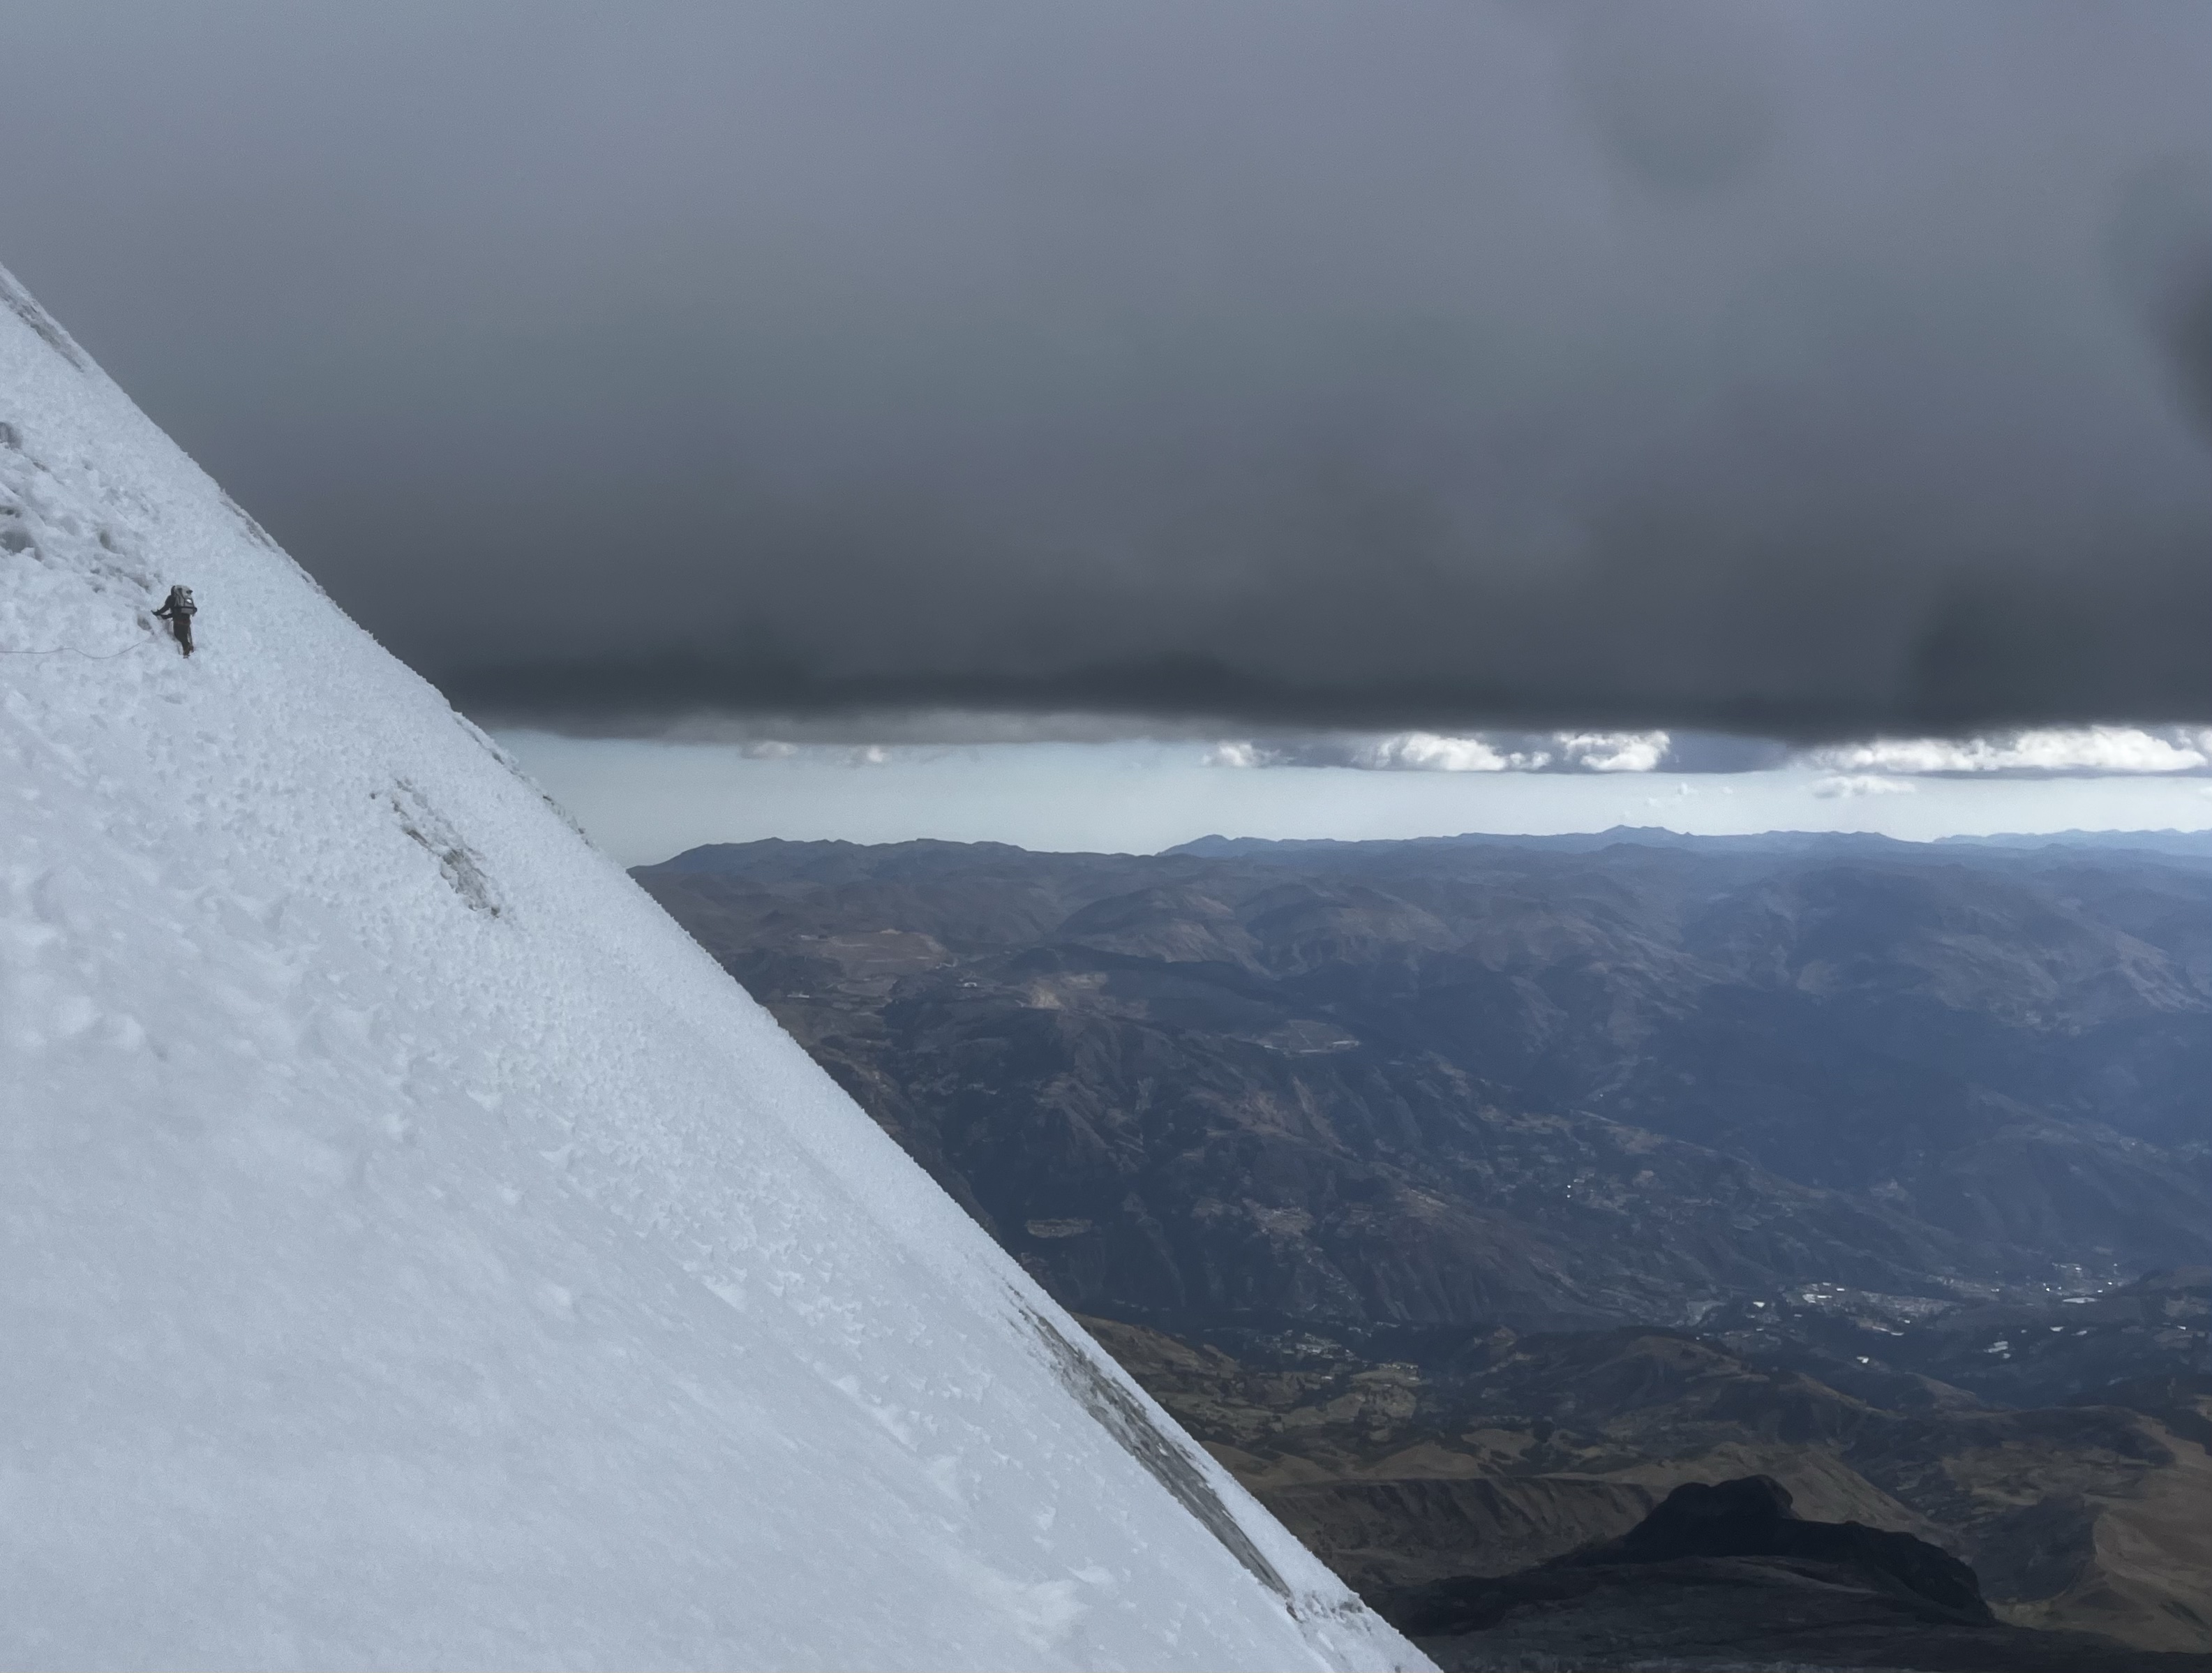
Topping out the second pitch with the valley in the background. Ranrapalca is the big mountain on the left.
He scratches up the pitch, slowly, but without aid or hanging. I hear a shout of frustration, and he waits for a while at a stance, but eventually continues. When he reaches the belay, he says resignedly, “I just shit my pants.” I laugh at the absurdity. “Literally?” “Yes, literally,” he says. “Didn’t you hear me calling out? I had this immense pressure in my belly the whole time you were climbing.”
“Sorry mate, I was fighting for my life up there,” say. He nods weakly, “Yeah, me too.”
“I held it back as long as I could, but I got to that first piton you placed and I just had to hang on it and let loose.” He says. “I felt so bad.”
Sorry is about all I can say. He doesn’t want to go down, which speaks to his mettle as a mountaineer. Setting solid rappel anchors in the terrain we just went up would have been difficult, so I’m relieved he still feels ok to advance. He even wants the next lead.
He checks out a mixed chimney in the left-hand corner. I think it looks hard, and advocate for exiting to the snow a few meters out right. He takes the rack, and advances up a meter or two to get a closer look at the chimney. On second thought, he decides against it, and returns the lead to me. A good call, I think. He will suffer gastrointestinal distress for the rest of the climb; and indeed, well into his return home. Likely Giardia.
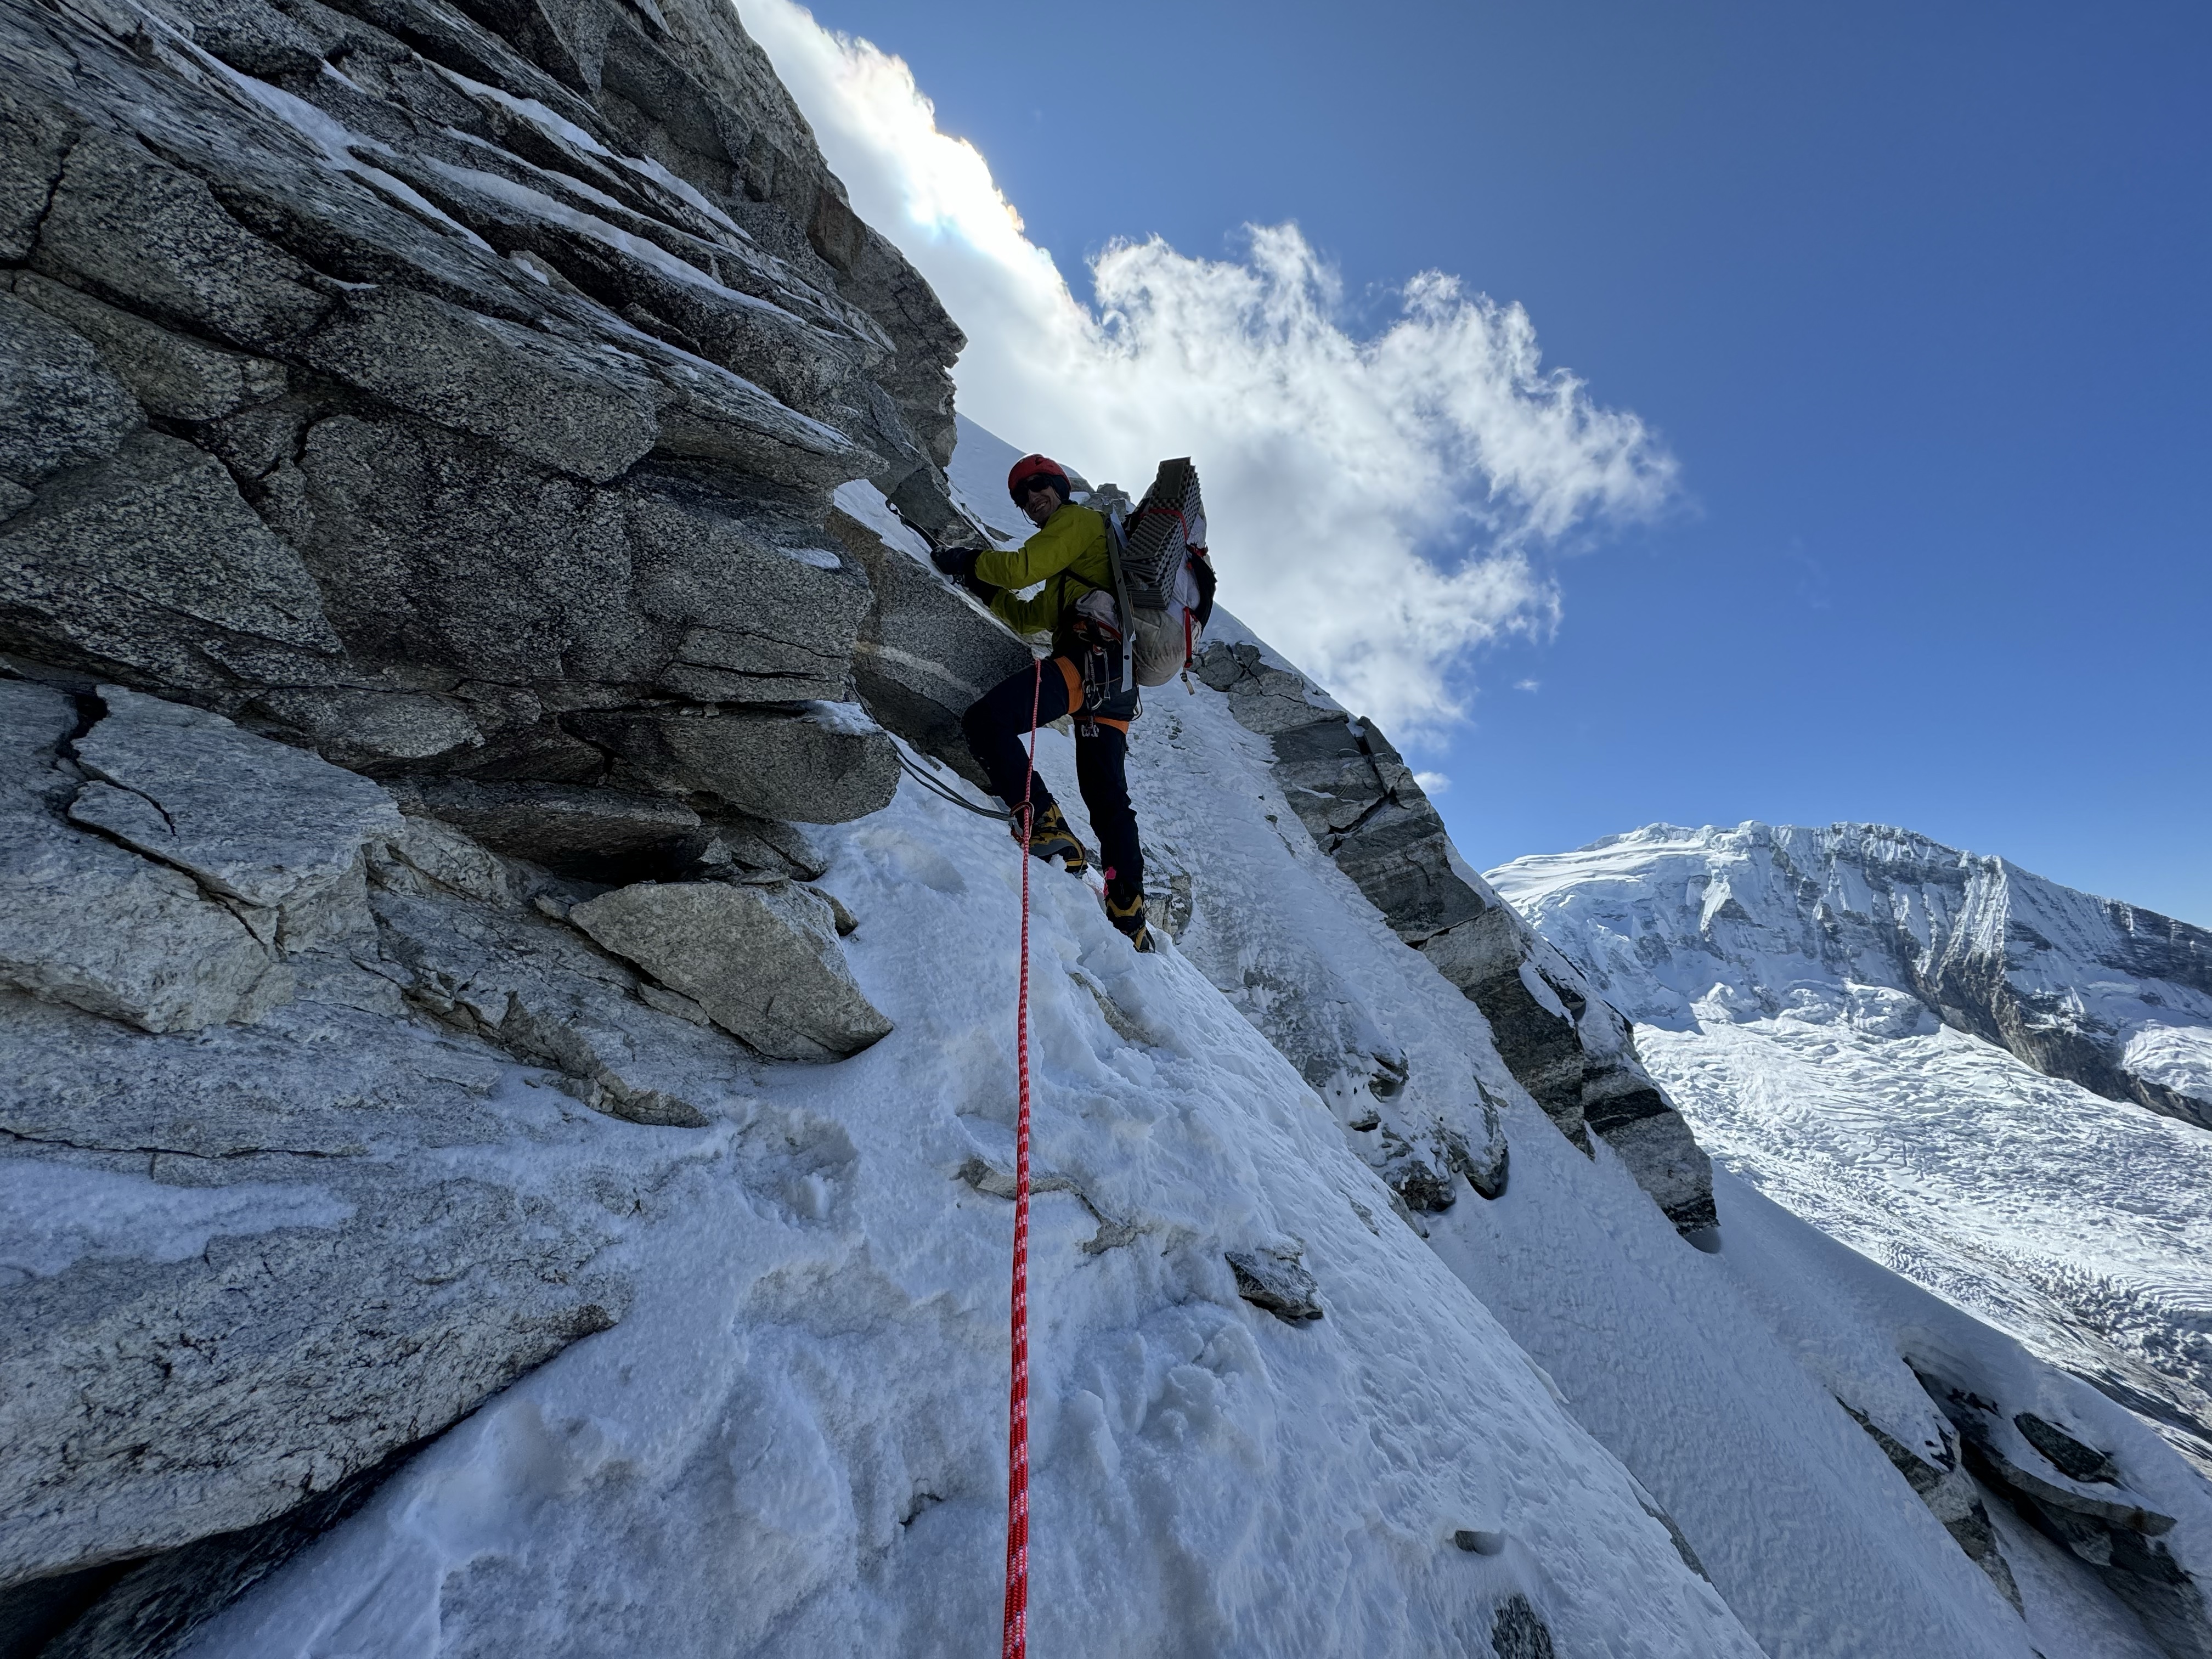
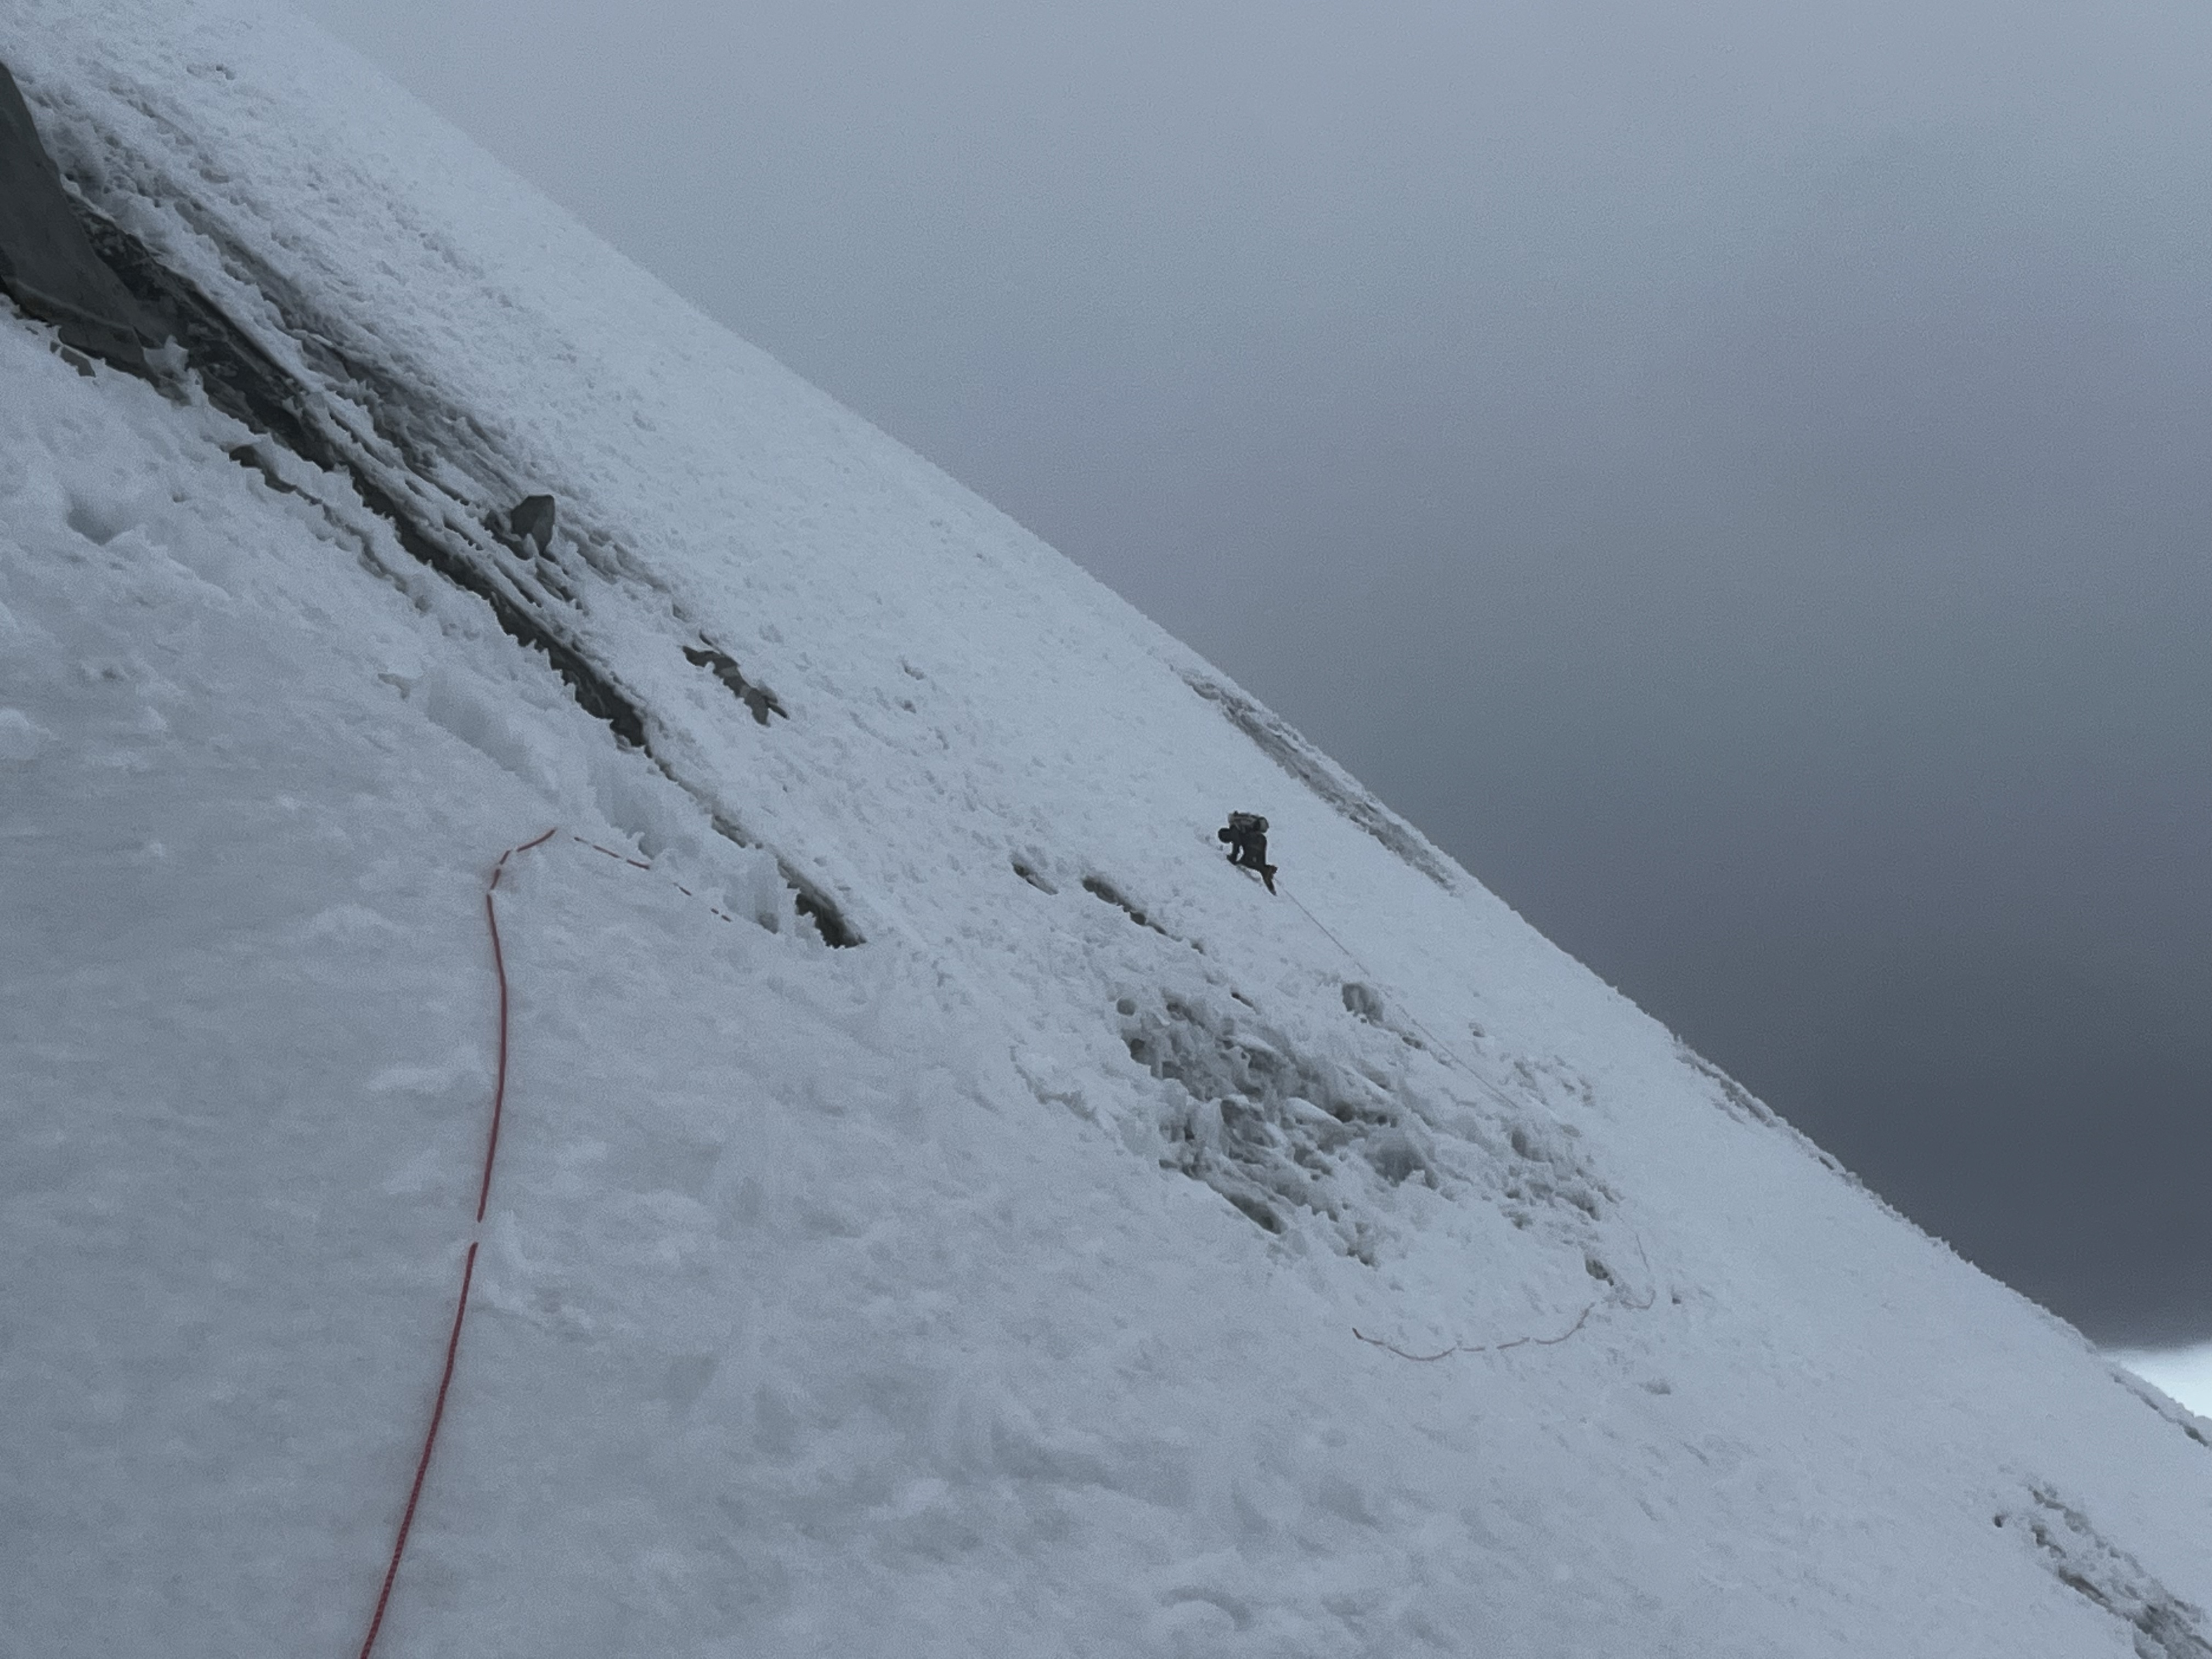
Leaving the belay, I scoot out on a traverse directly to the right. It is mixed for a few moves, with feet on slabby rock covered with a few inches of snow, which is tough to trust. I place a .75 Camalot in questionably attached rock, and then embark on a two-meter traverse with no tool placements and very poor hands, but thick enough ice for frontpointing. I lean forward and engage my calves to balance on my toes. With no possibility of protection, this keeps my lungs in my throat. I scootch over bit by bit until I can sink a tool into the ice on the right. I breathe a big sigh of relief. “Ice climbing!” I exclaim, happily. “I can do this.”
I move out right onto the ice and snow field, at a grade of around 70 degrees. It’s ice climbing but won’t accept an ice screw. I protect with a questionable snow picket, and keep on moving up. Eventually the ice gives way to deep powder snow – a familiar sensation from winter climbing at home. The wet powder snow melts into my gloves and gives me the screaming barfies. Another familiar feeling. But finally I climb out of the shadow, and I’m in the strong equatorial sun, not a freezing Colorado winter. I sit back on my heels and shake out the cold, screaming softly. The pain in my fingers clears, as it always does, and soon I am climbing again, up to the crest of the ridge.
The guidebook describes a simple walk back down to the other side of the ridge, and the safety of a flat glacier. Unfortunately, climate change has altered the mountain here, and instead of a simple descent to the backside, I find myself on a corniced ridge with a huge crevasse below it. Spooky.
I back down the ridge a few meters, to where I judge myself to be safe from the threat of the cornice collapsing. The snow is very deep, unconsolidated powder. It won’t make for a great belay, but I do my best. I hammer my last remaining snow picket as deep as it will go, which is pretty deep, and dig out a channel for the cordino. In addition, I bury my ice tool in a t-slot, and cover it with snow. I stomp on top of it as much as I can, trying to “work-harden” the placement, but it still feels worrying loose. Oh well, it’s the best I can do. I equalize the two pieces and yell out “On belay!”
Calum follows up without problem, thankfully not testing the belay. This is a decision point: we can either attempt to descend the gully we just came up, or we can continue on towards the summit of Vallunaraju, and down the other side. Thankfully, we are on the same page: descent would be time-consuming, difficult and dangerous. Adelante. We go on.
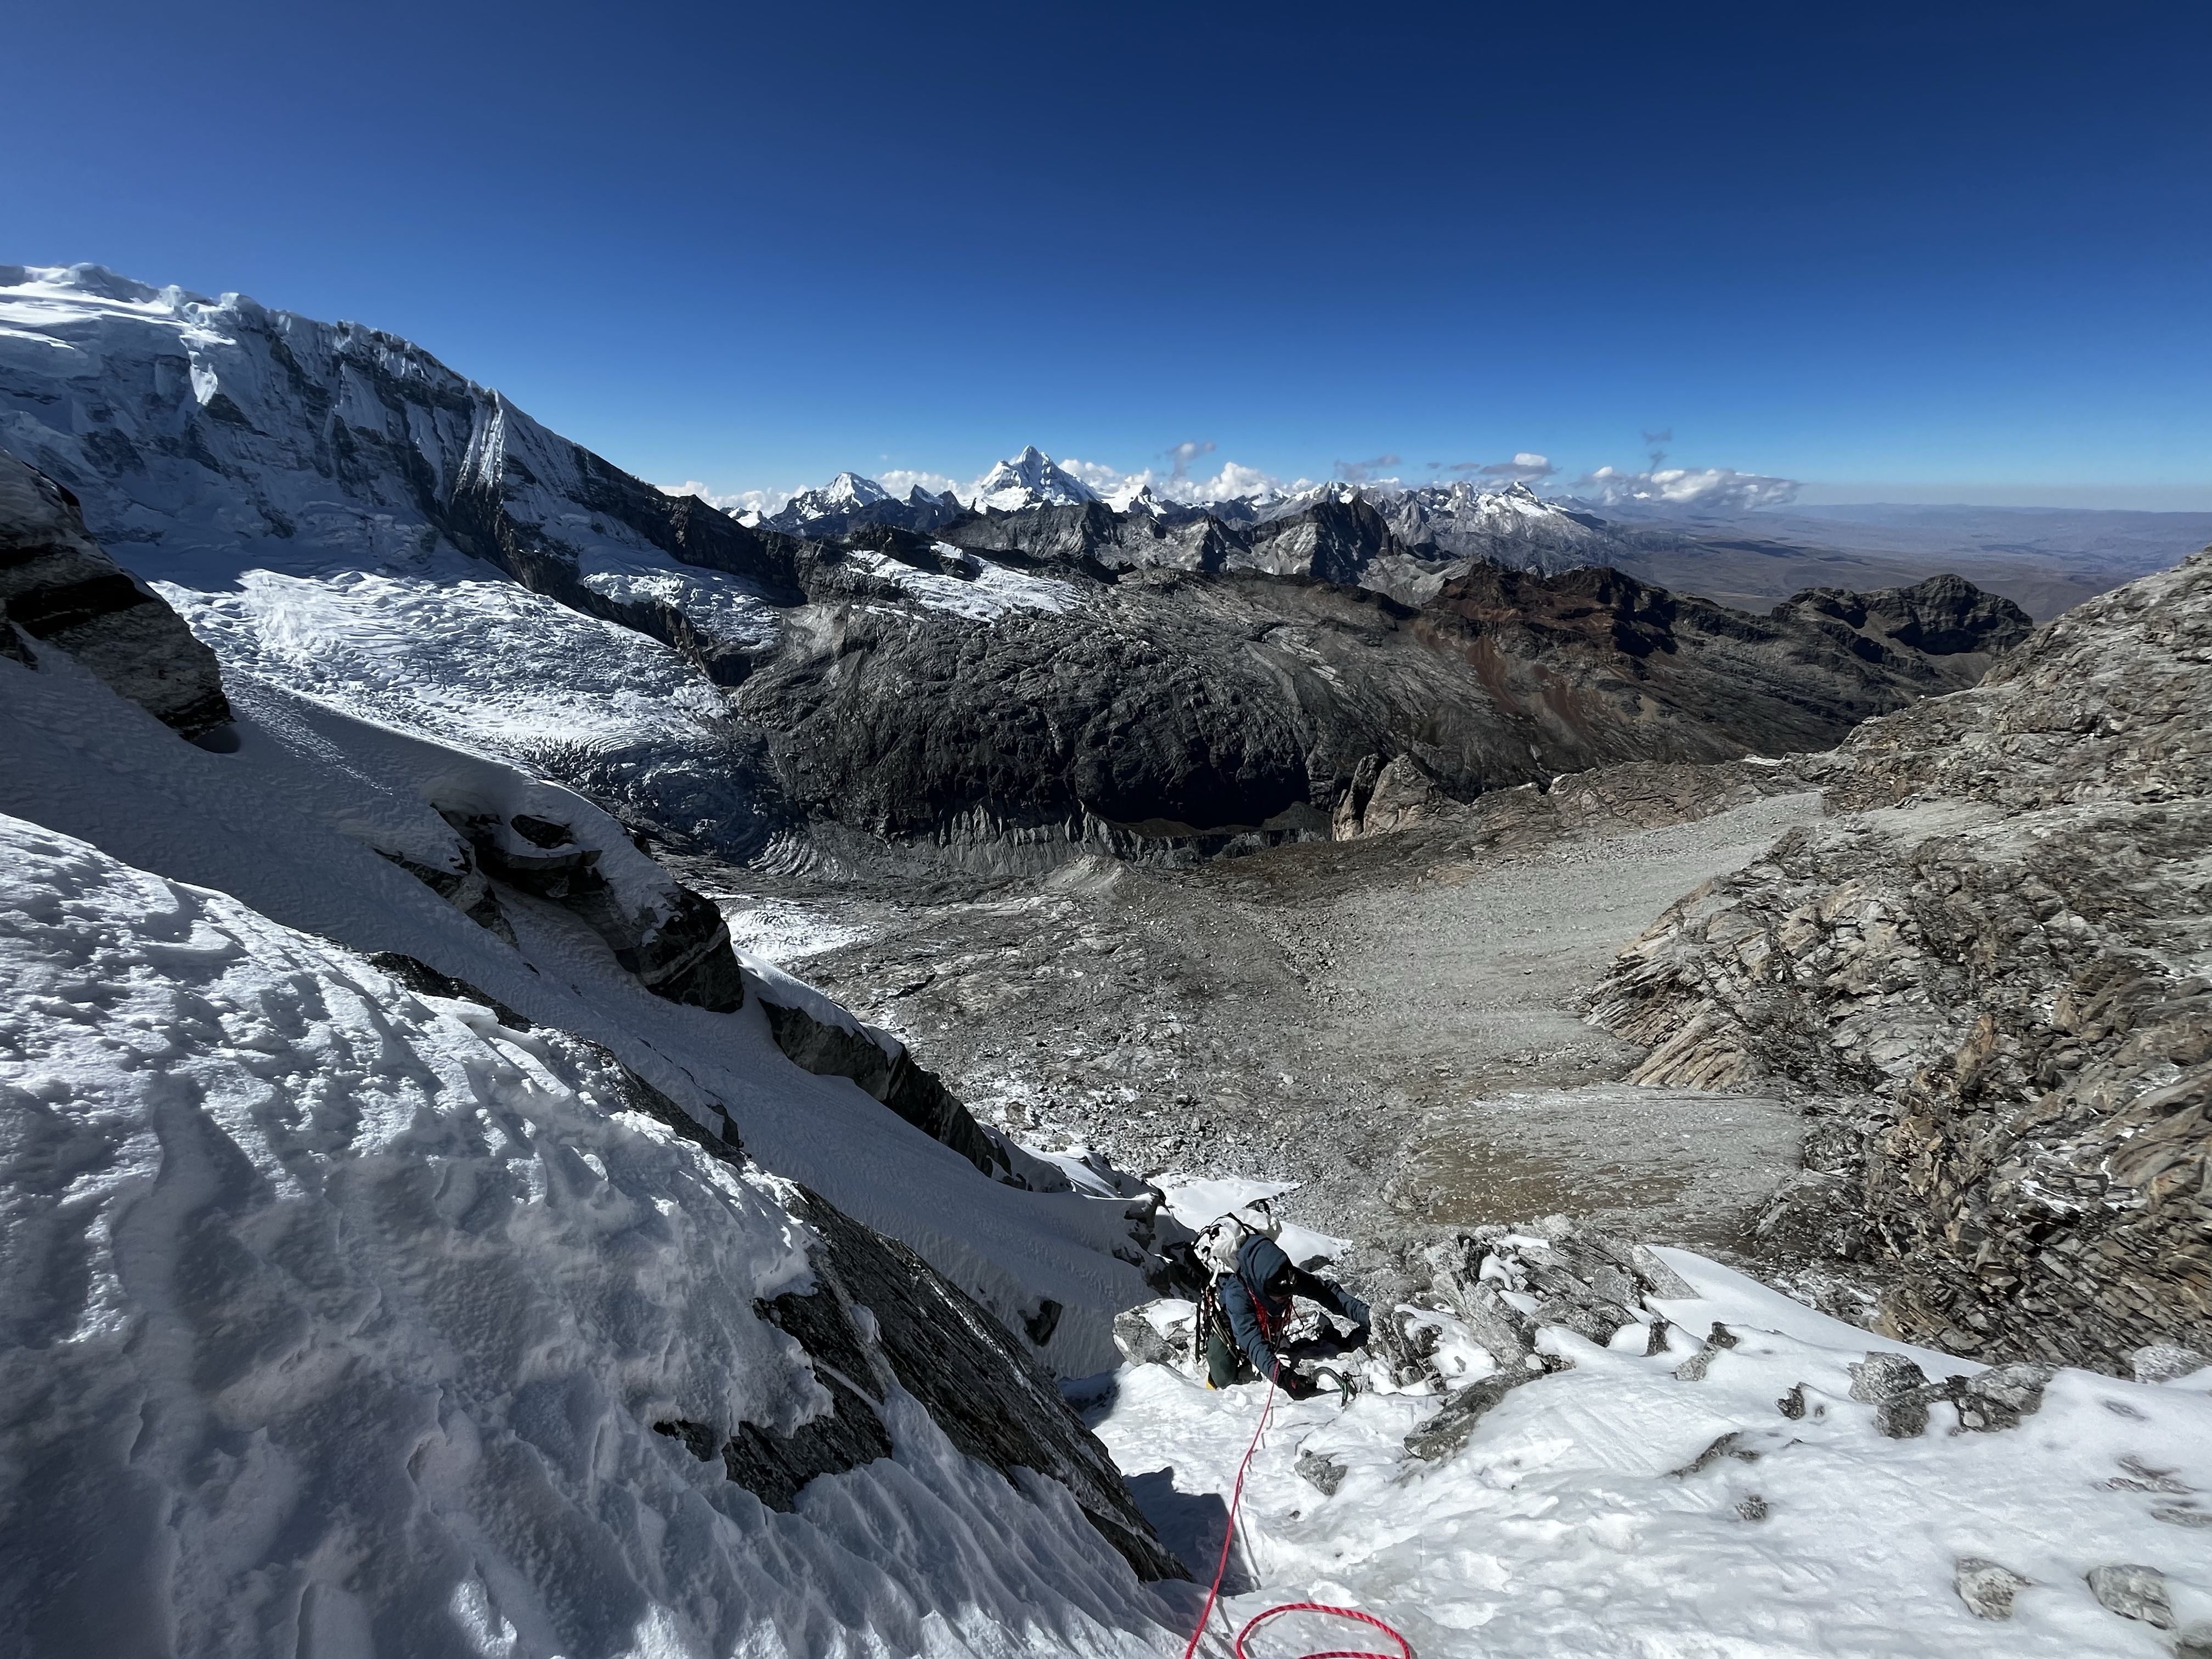
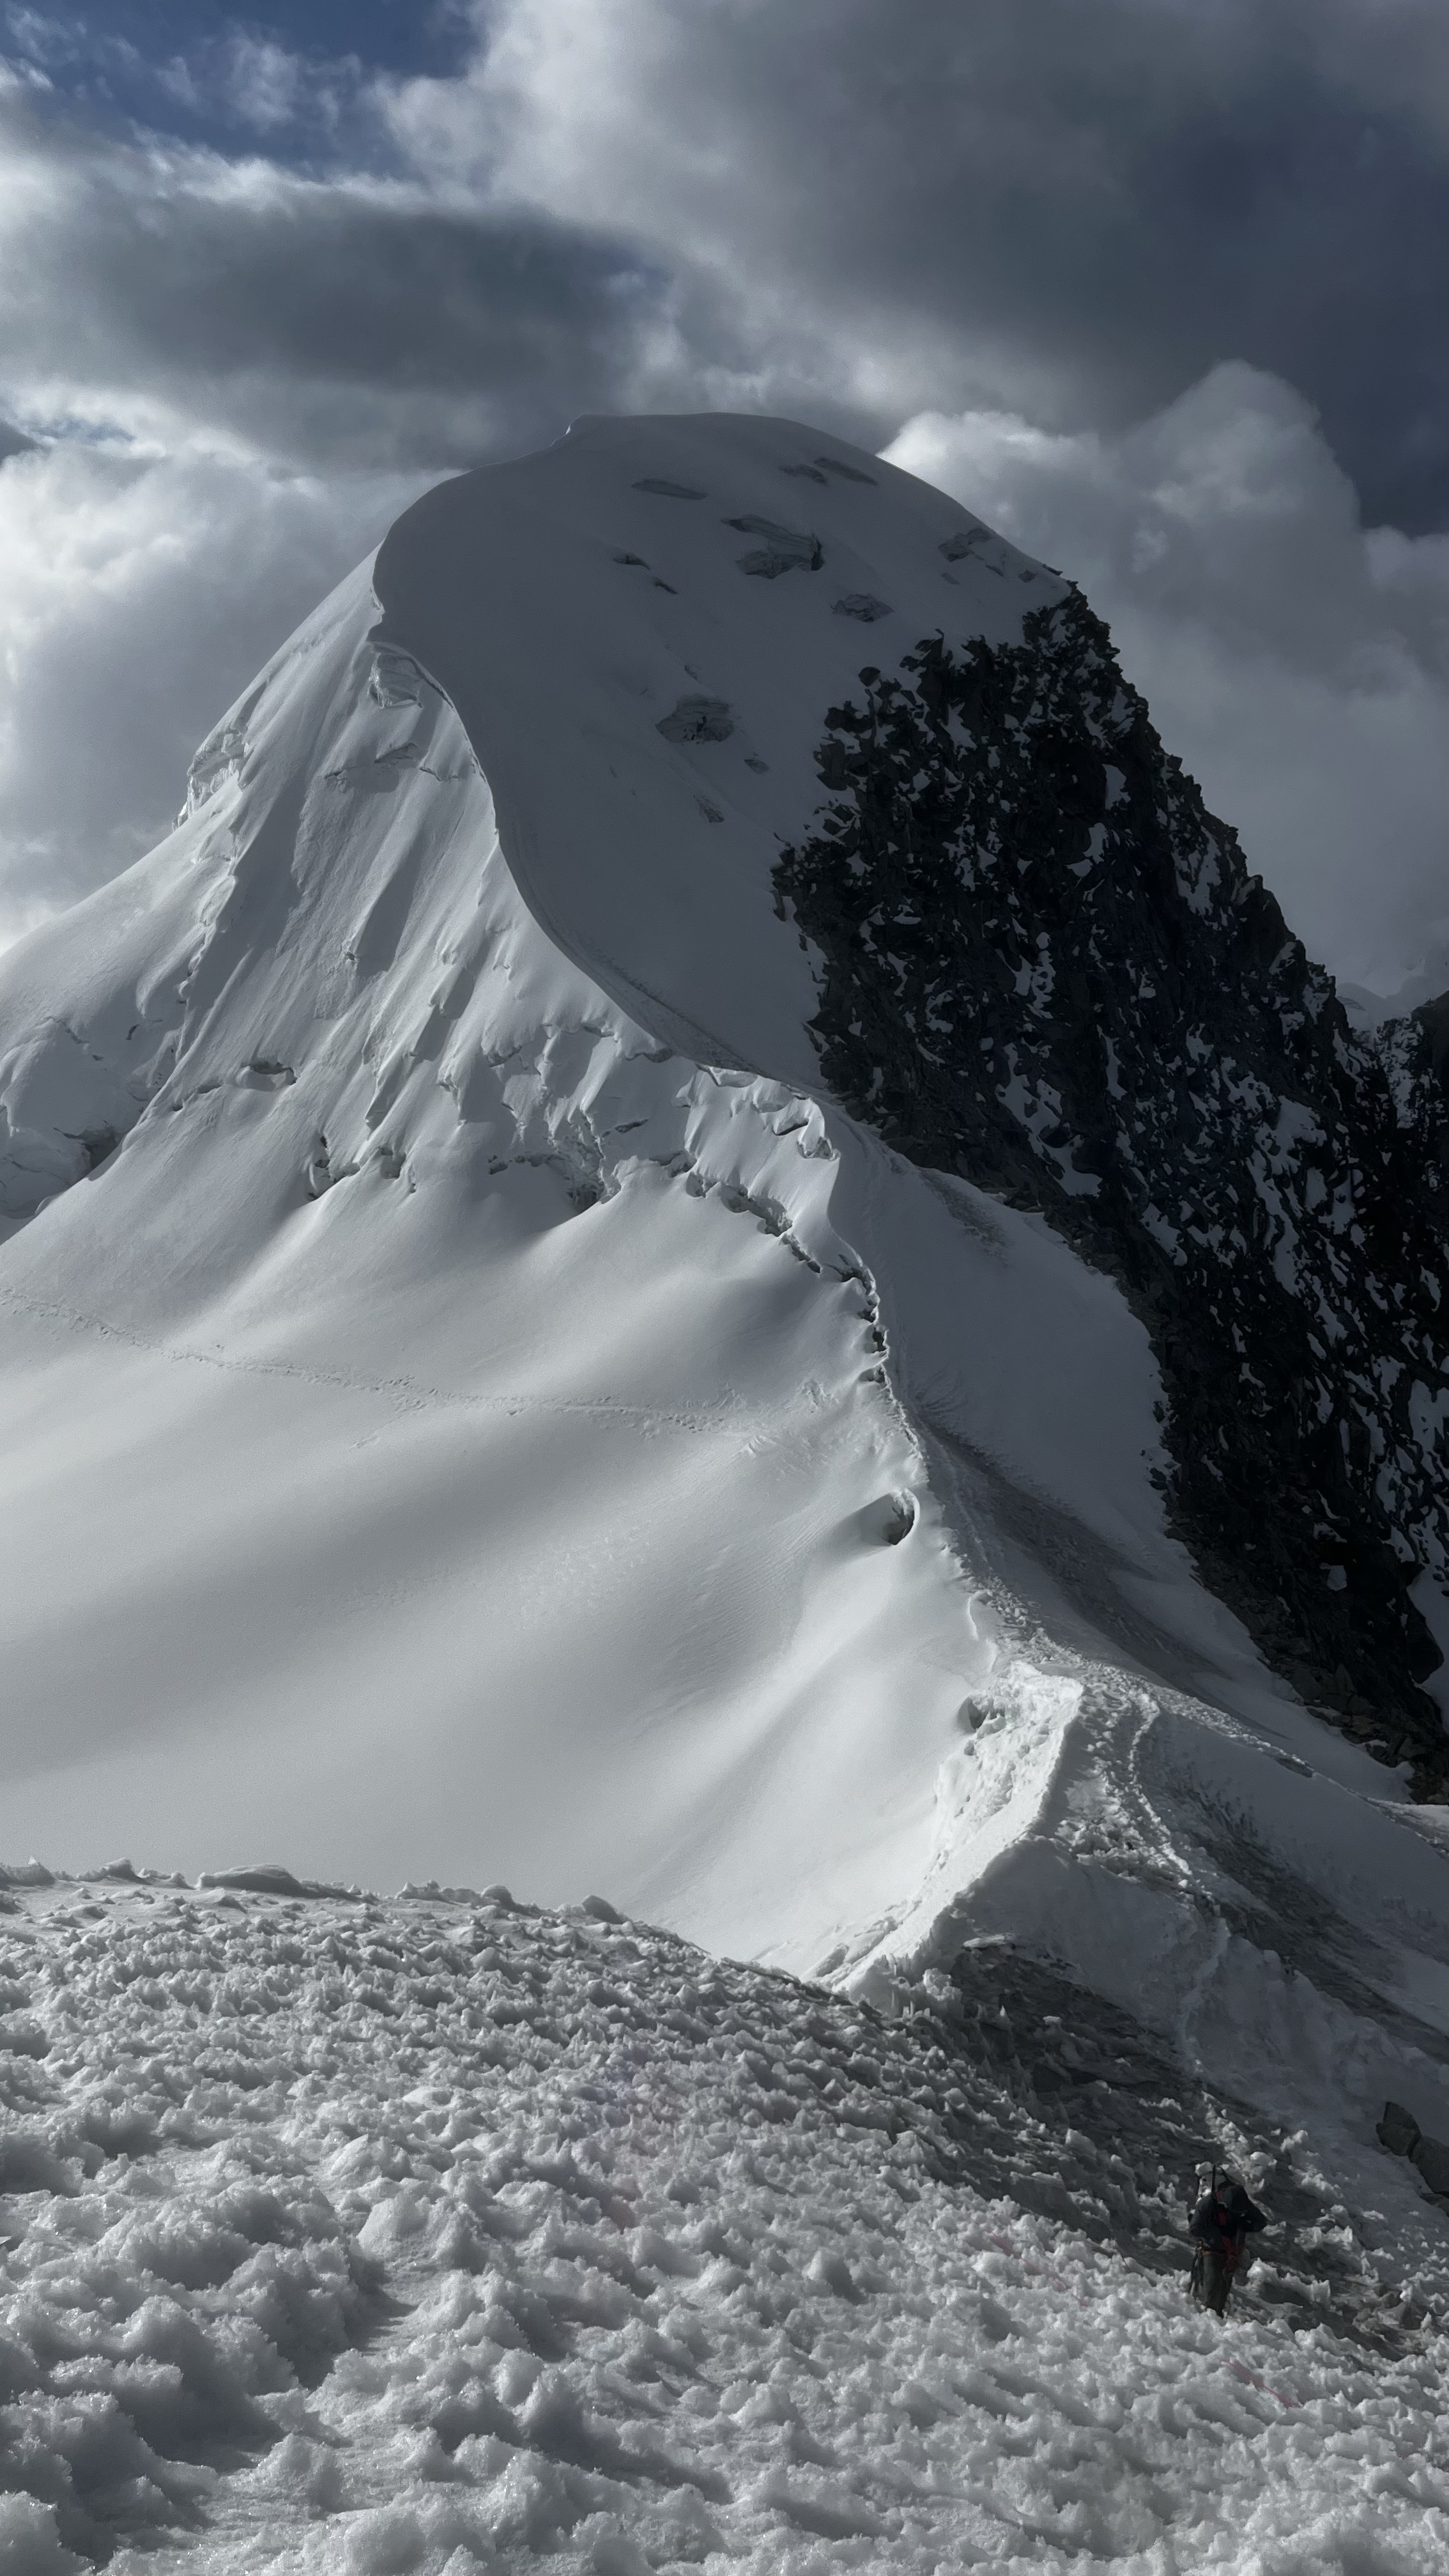
We climbed out of the snowy gully on the far left of this photo – if you look closely, you can see our footsteps exiting onto the ridge, just to the right of the small serac. This gully can also be seen in the middle of the following photo.
Cornices are a big problem in the Cordillera Blanca. A cornice, for those who don’t know, is a big crest of wind-blown snow on top of a ridge. While they look super aesthetic and impressive, cornices are highly dangerous to mountaineers because they are difficult to assess from the windward side. It is hard to know where is solid mountain or glacier, and where is overhanging cornice.
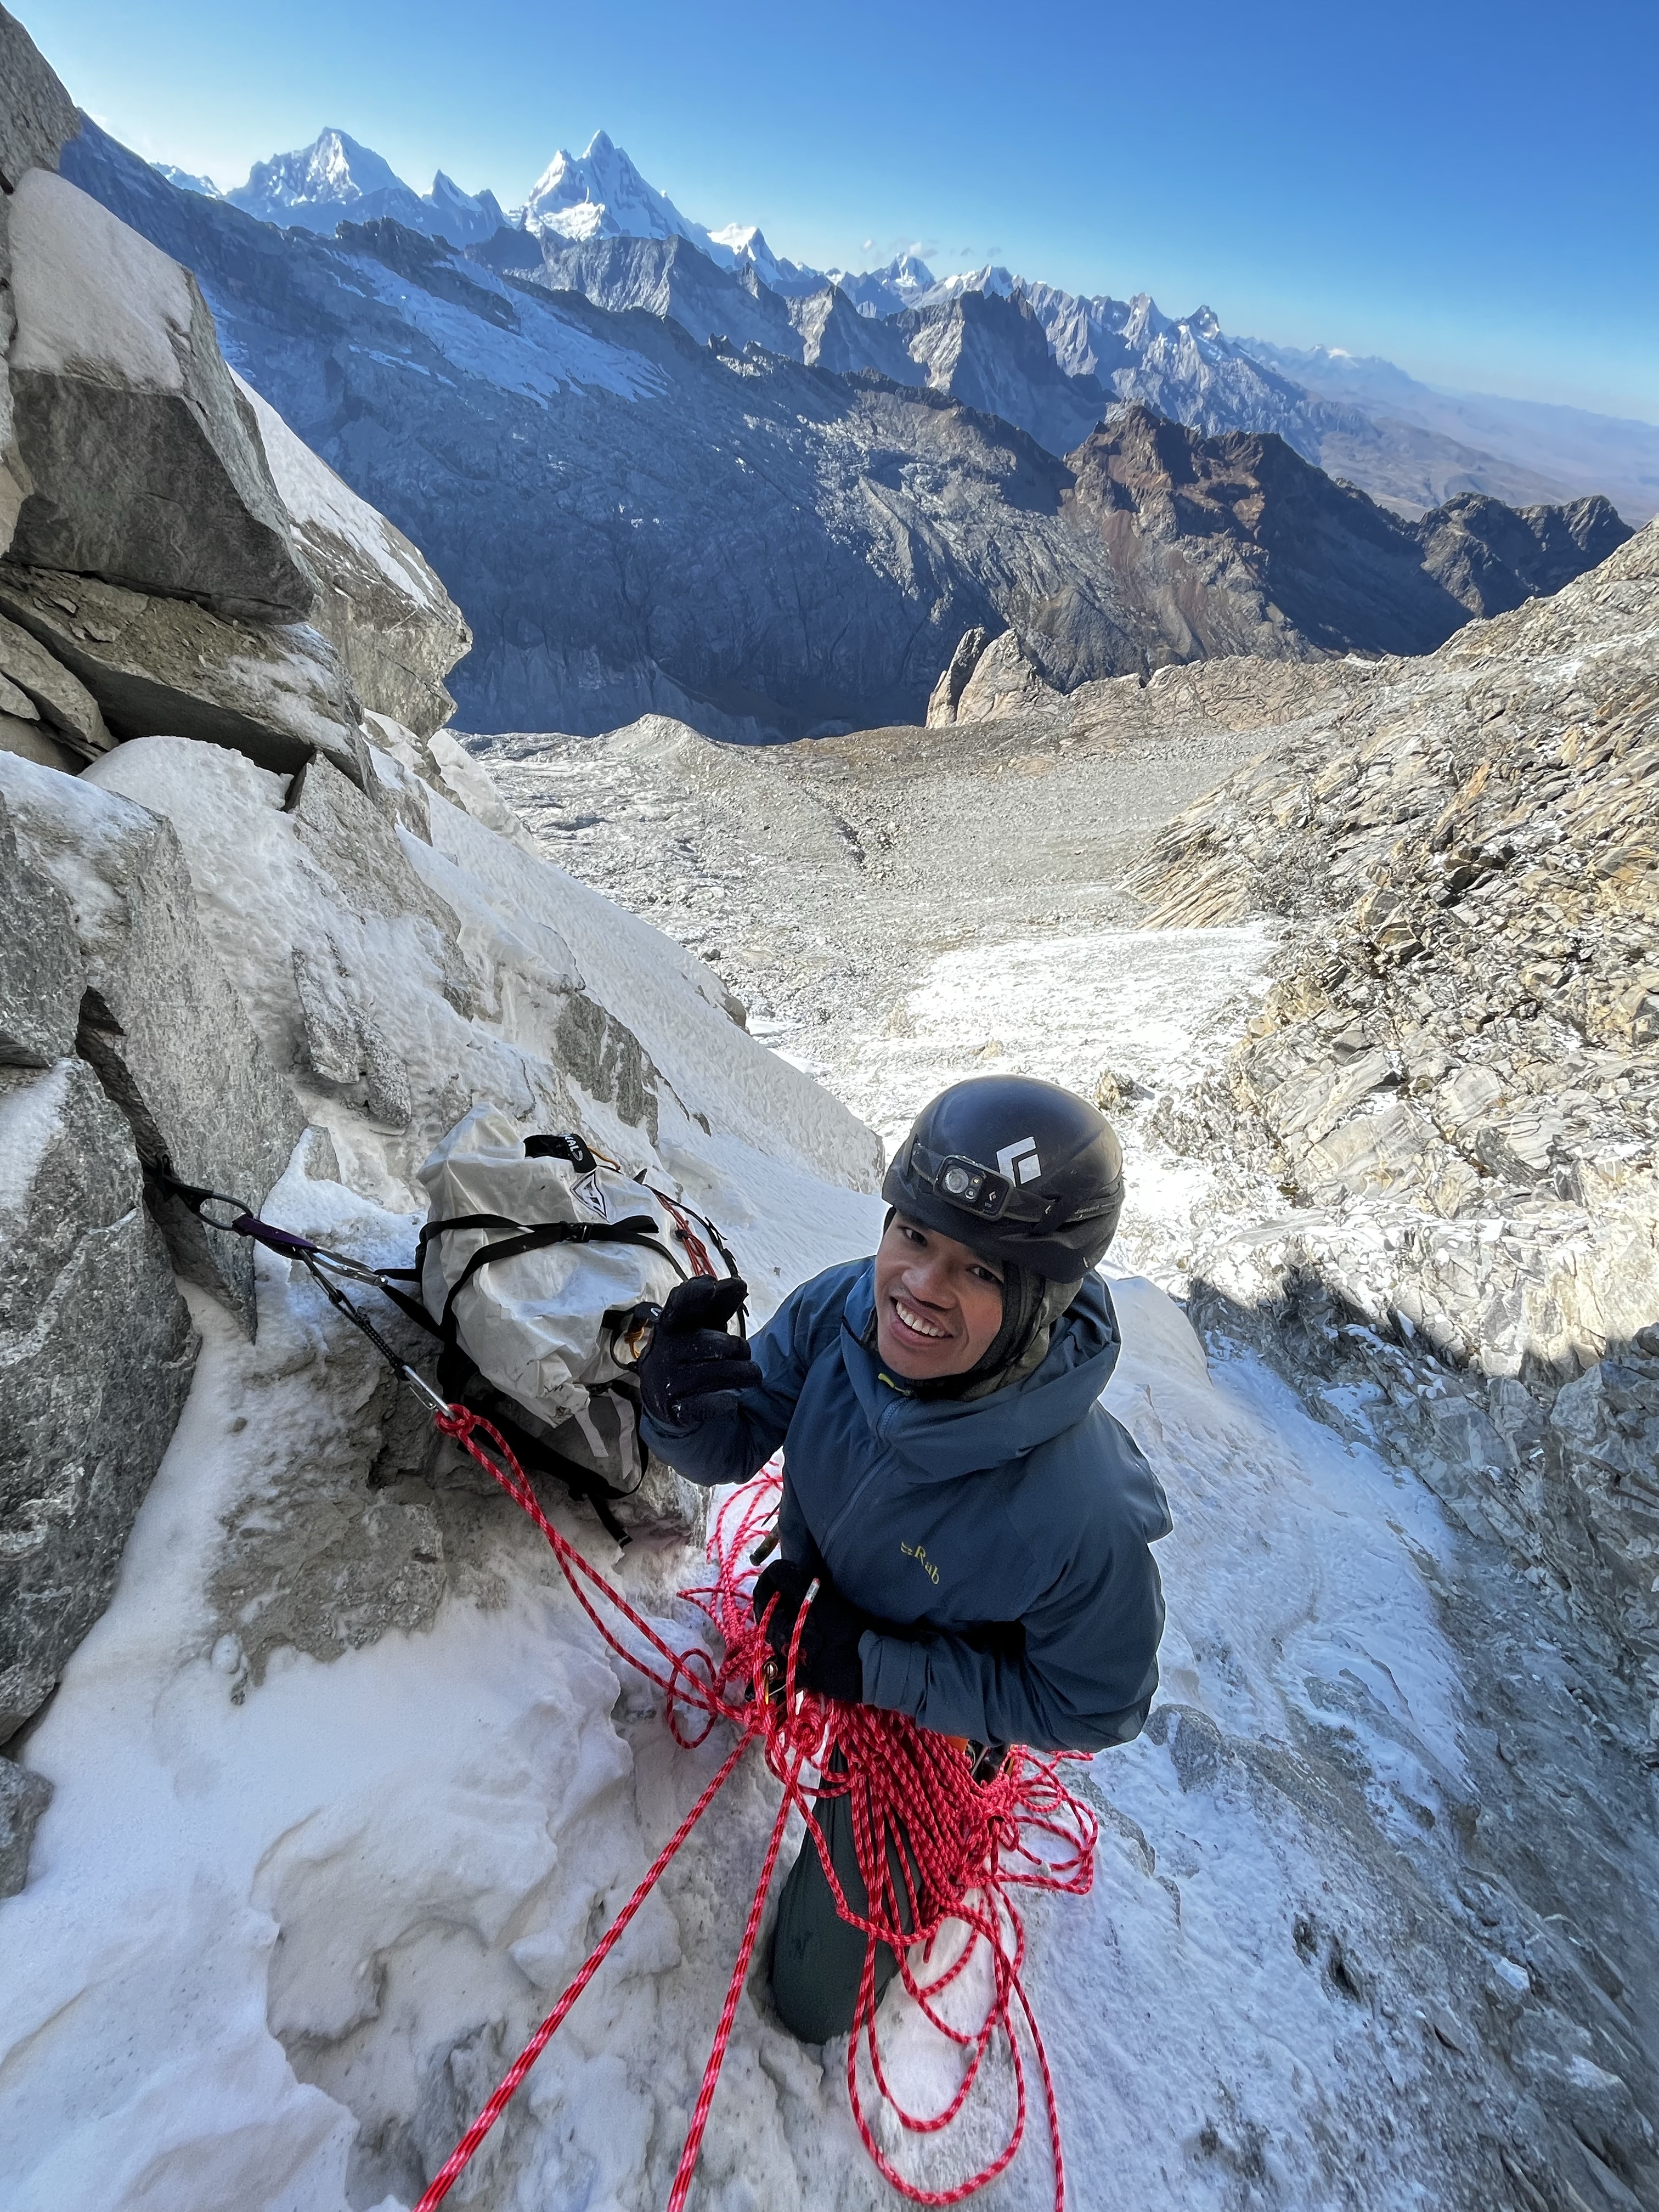
Our path to the summit takes us along a corniced ridge. Thankfully, we seem to have topped out in a slightly more secure spot, and I can take a hurried glimpse along the ridge line. There’s some cornice, and a gaping crevasse below, but the overhang doesn’t seem to be massive. The ridge should be safe to traverse as long as we stay a little lower. Our only issue is protection: we have only brought three snow pickets with us, and one is in the anchor. Calum takes the lead 70 meters, places a picket with a microtraxion, and I simulclimb for 70 meters, until he places another picket and belays me along. We swap spots and do the same again: I take the lead for another 210 meters, which deposits us on safe, flat ground at the base of Vallunaraju’s North face. I belay off an ice screw, having spent both pickets on the ridge.
Keeled over in pain – a tough acclimatization climb
Here we take a break, allowing ourselves some psychological rest. Having climbed the gully and the ridge, it appears there is nothing left to do but walk up to the summit, more or less. The sun is out, we eat some snack food and drink some coca tea. We look towards the south summit, but no one is there – the guided groups will have been up and down already, and are certainly now on their way back to Huaraz. The mountain, usually so crowded, is ours alone.
The trek up the North face is straightforward but punishing. We are each laden with heavy packs, containing our sleeping bags, pads, food, stove and tent. The effects of altitude on our bodies, pushing 5,600 meters after sleeping at 5,200, are palpable.
After a while of very slow walking, we reach the base of a rock outcropping on the ridge. Brad Johnson’s book calls for a 10-meter pitch of 5.2 rock climbing, but this wall looks much steeper than that. Calum, in the lead, walks up to the base of the rock, hoping to place one of our cams at the least, and discovers that a deep bergshrund has formed between the rock and the glacier. He steps back, carefully. The ‘shrund is thinly covered with rotten snow and ice, and he elects not to try and jump it to reach the rock. Neither of us see an easy path through the rock buttress anyways. Maybe Johnson’s pitch fell off, or got buried in the 20 years since he published the first edition of his guidebook — who knows?
The grey patch is aerated ice covering the bergshrund – an endless drop lies below.
Calum instead traverses 40 meters or so to the right, onto the main slope of the mountain. It’s pretty clear what has happened – solar radiation had been absorbed by the rock buttress, which had then conveyed it down into the body of the glacier. That heat traveling through the rock had caused the glacier to melt anywhere it was in contact with the rock, creating a crevasse. By traversing far away from the rock, it should be possible to pass the gap.
And indeed, it is, although progress is slow for both Calum as the leader and me as the follower – it’s a spooky feeling not knowing how deep the snow coverage is and where, exactly, the crevasse ends. Calum protects himself with questionable pickets and airy ice screws, before finally taking the metaphorical plunge and heading up and over the gap. He puts me on belay, and I gain respect for his methodical lead as I follow. The mountain has the consistency of cotton candy – it’s mostly air. I punch a foot through what seems to be solid ice at one point and cry out, despite the top rope my buddy is belaying me on.
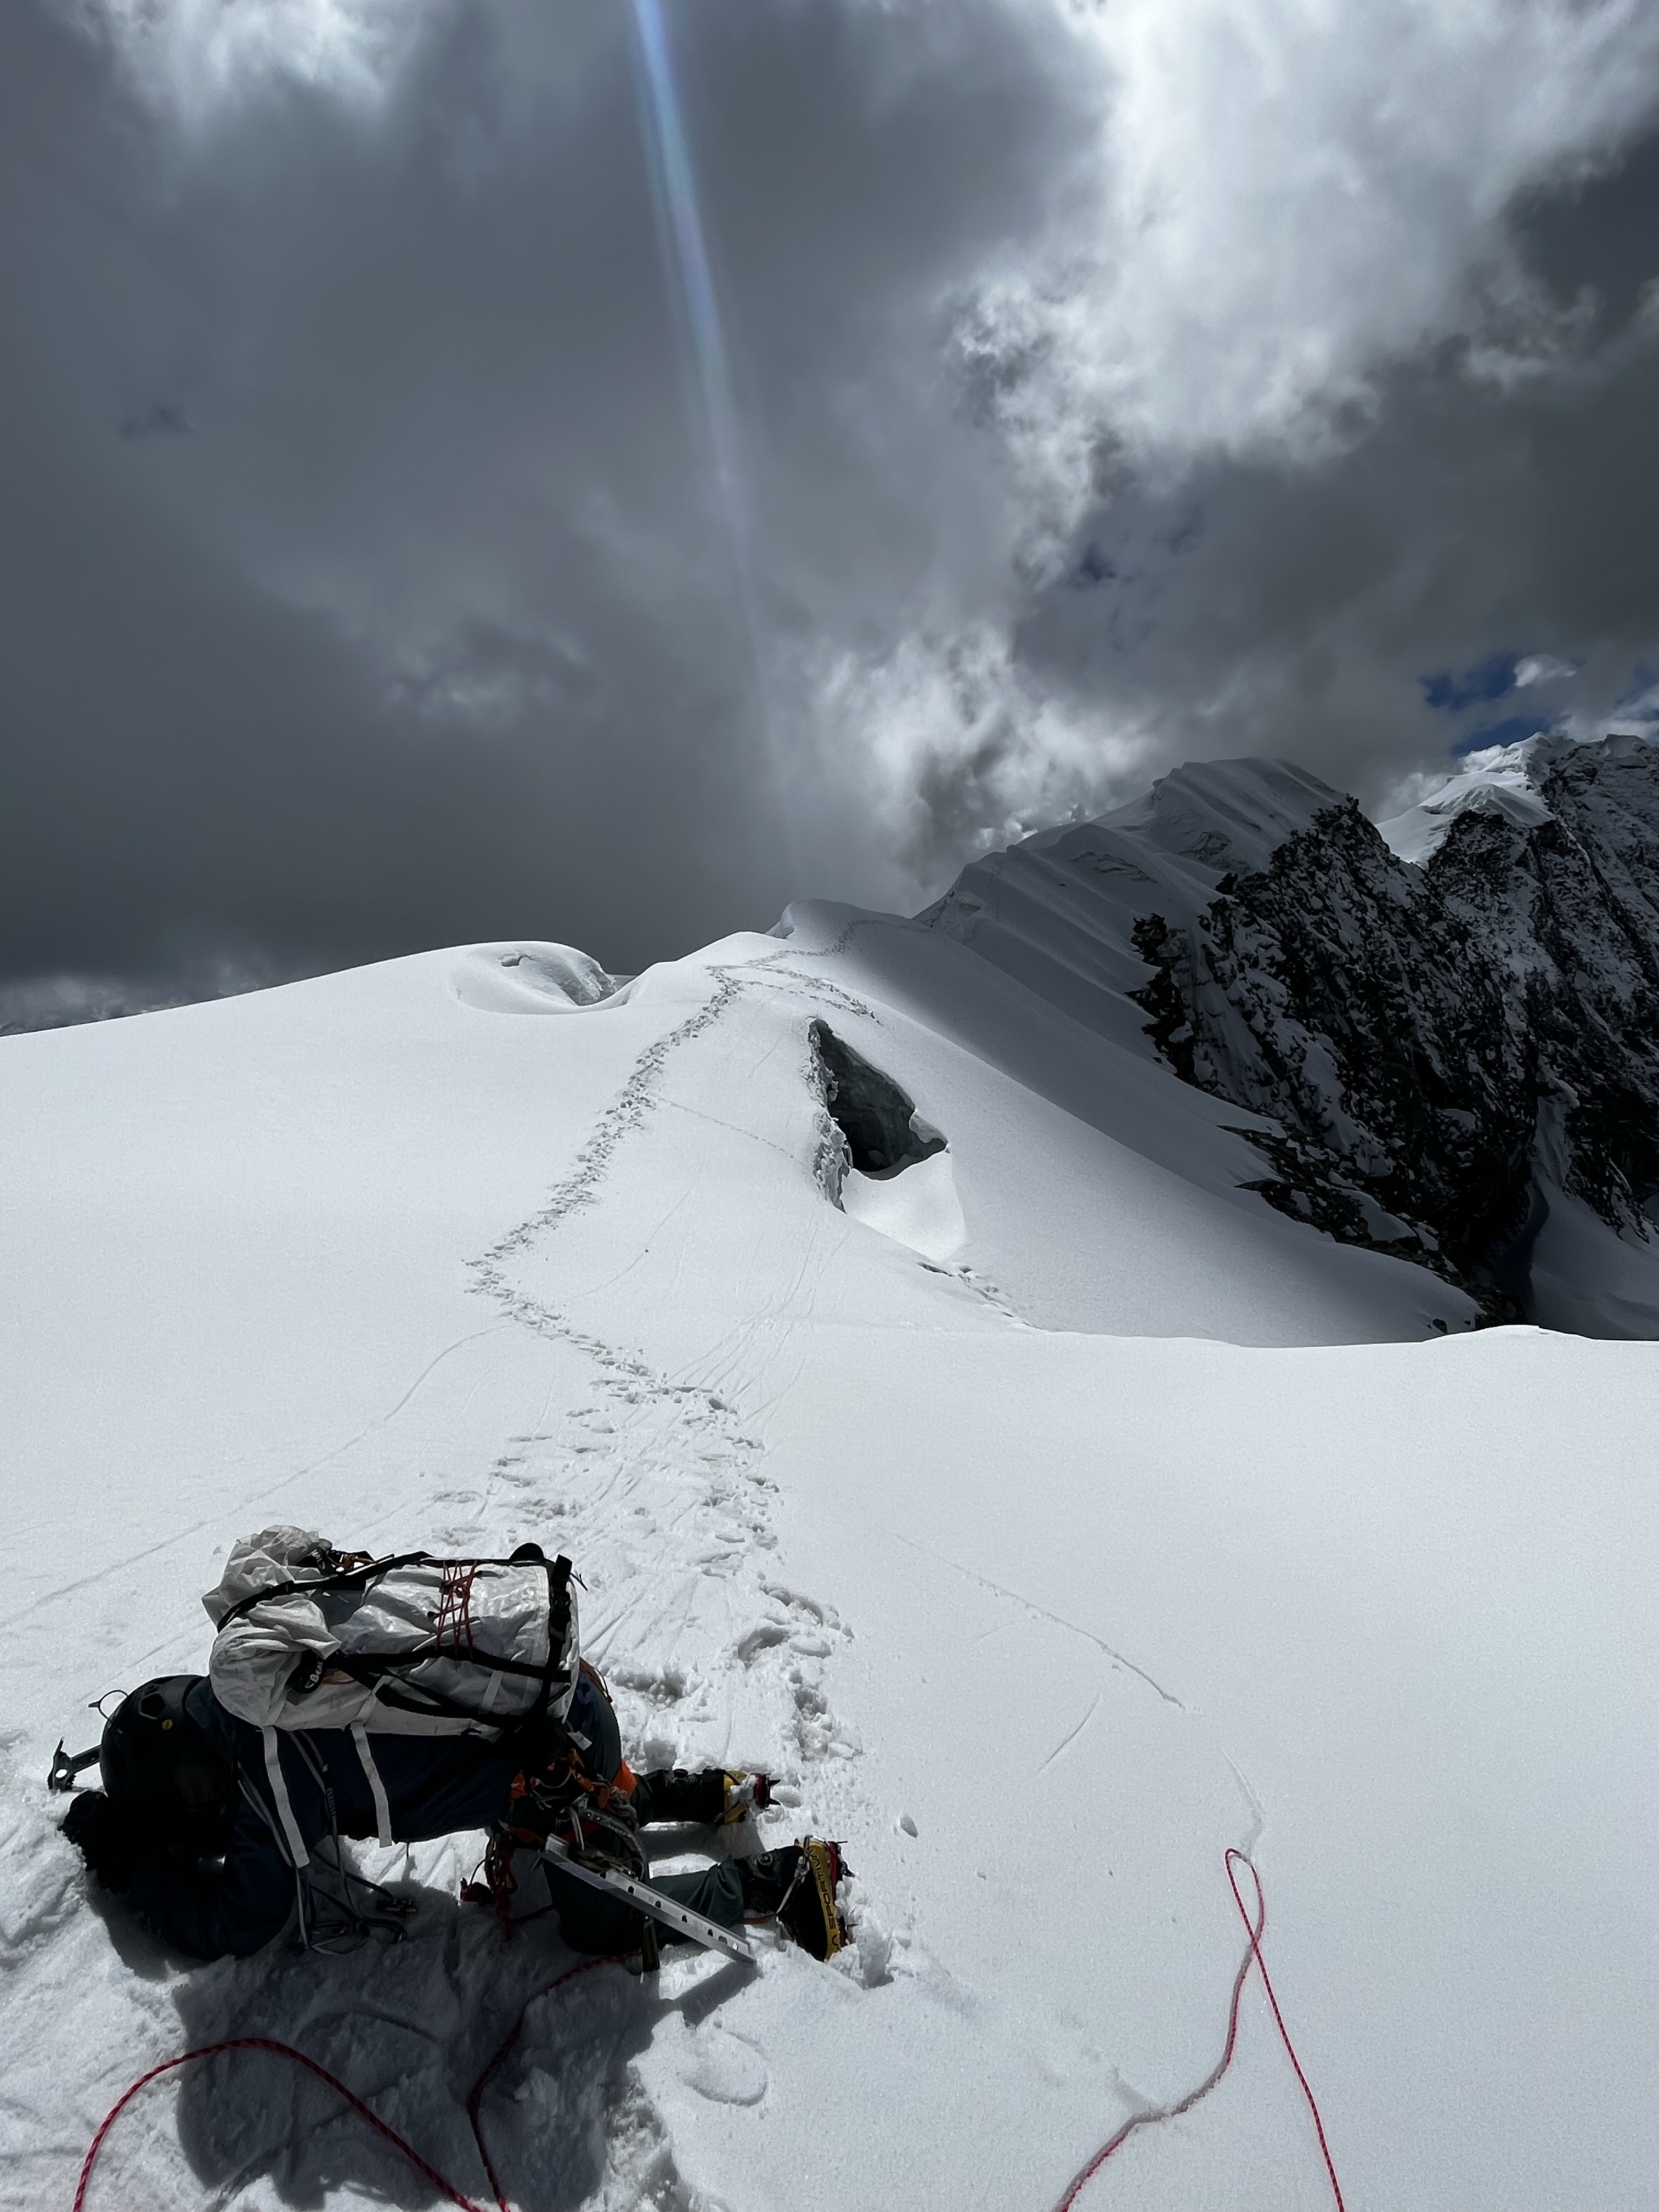
We surpass the gash across the mountain. I take one more 70-meter pitch of moderate snow, and run out of rope just a meter short of the summit. Here, the snow is solid: consolidated and firm. I pound in a secure picket and bring Calum up. He reaches the belay, and sits. Neither of us feels much motivation to walk the extra two meters to the true summit. It doesn’t help that we’re now in a cloud.
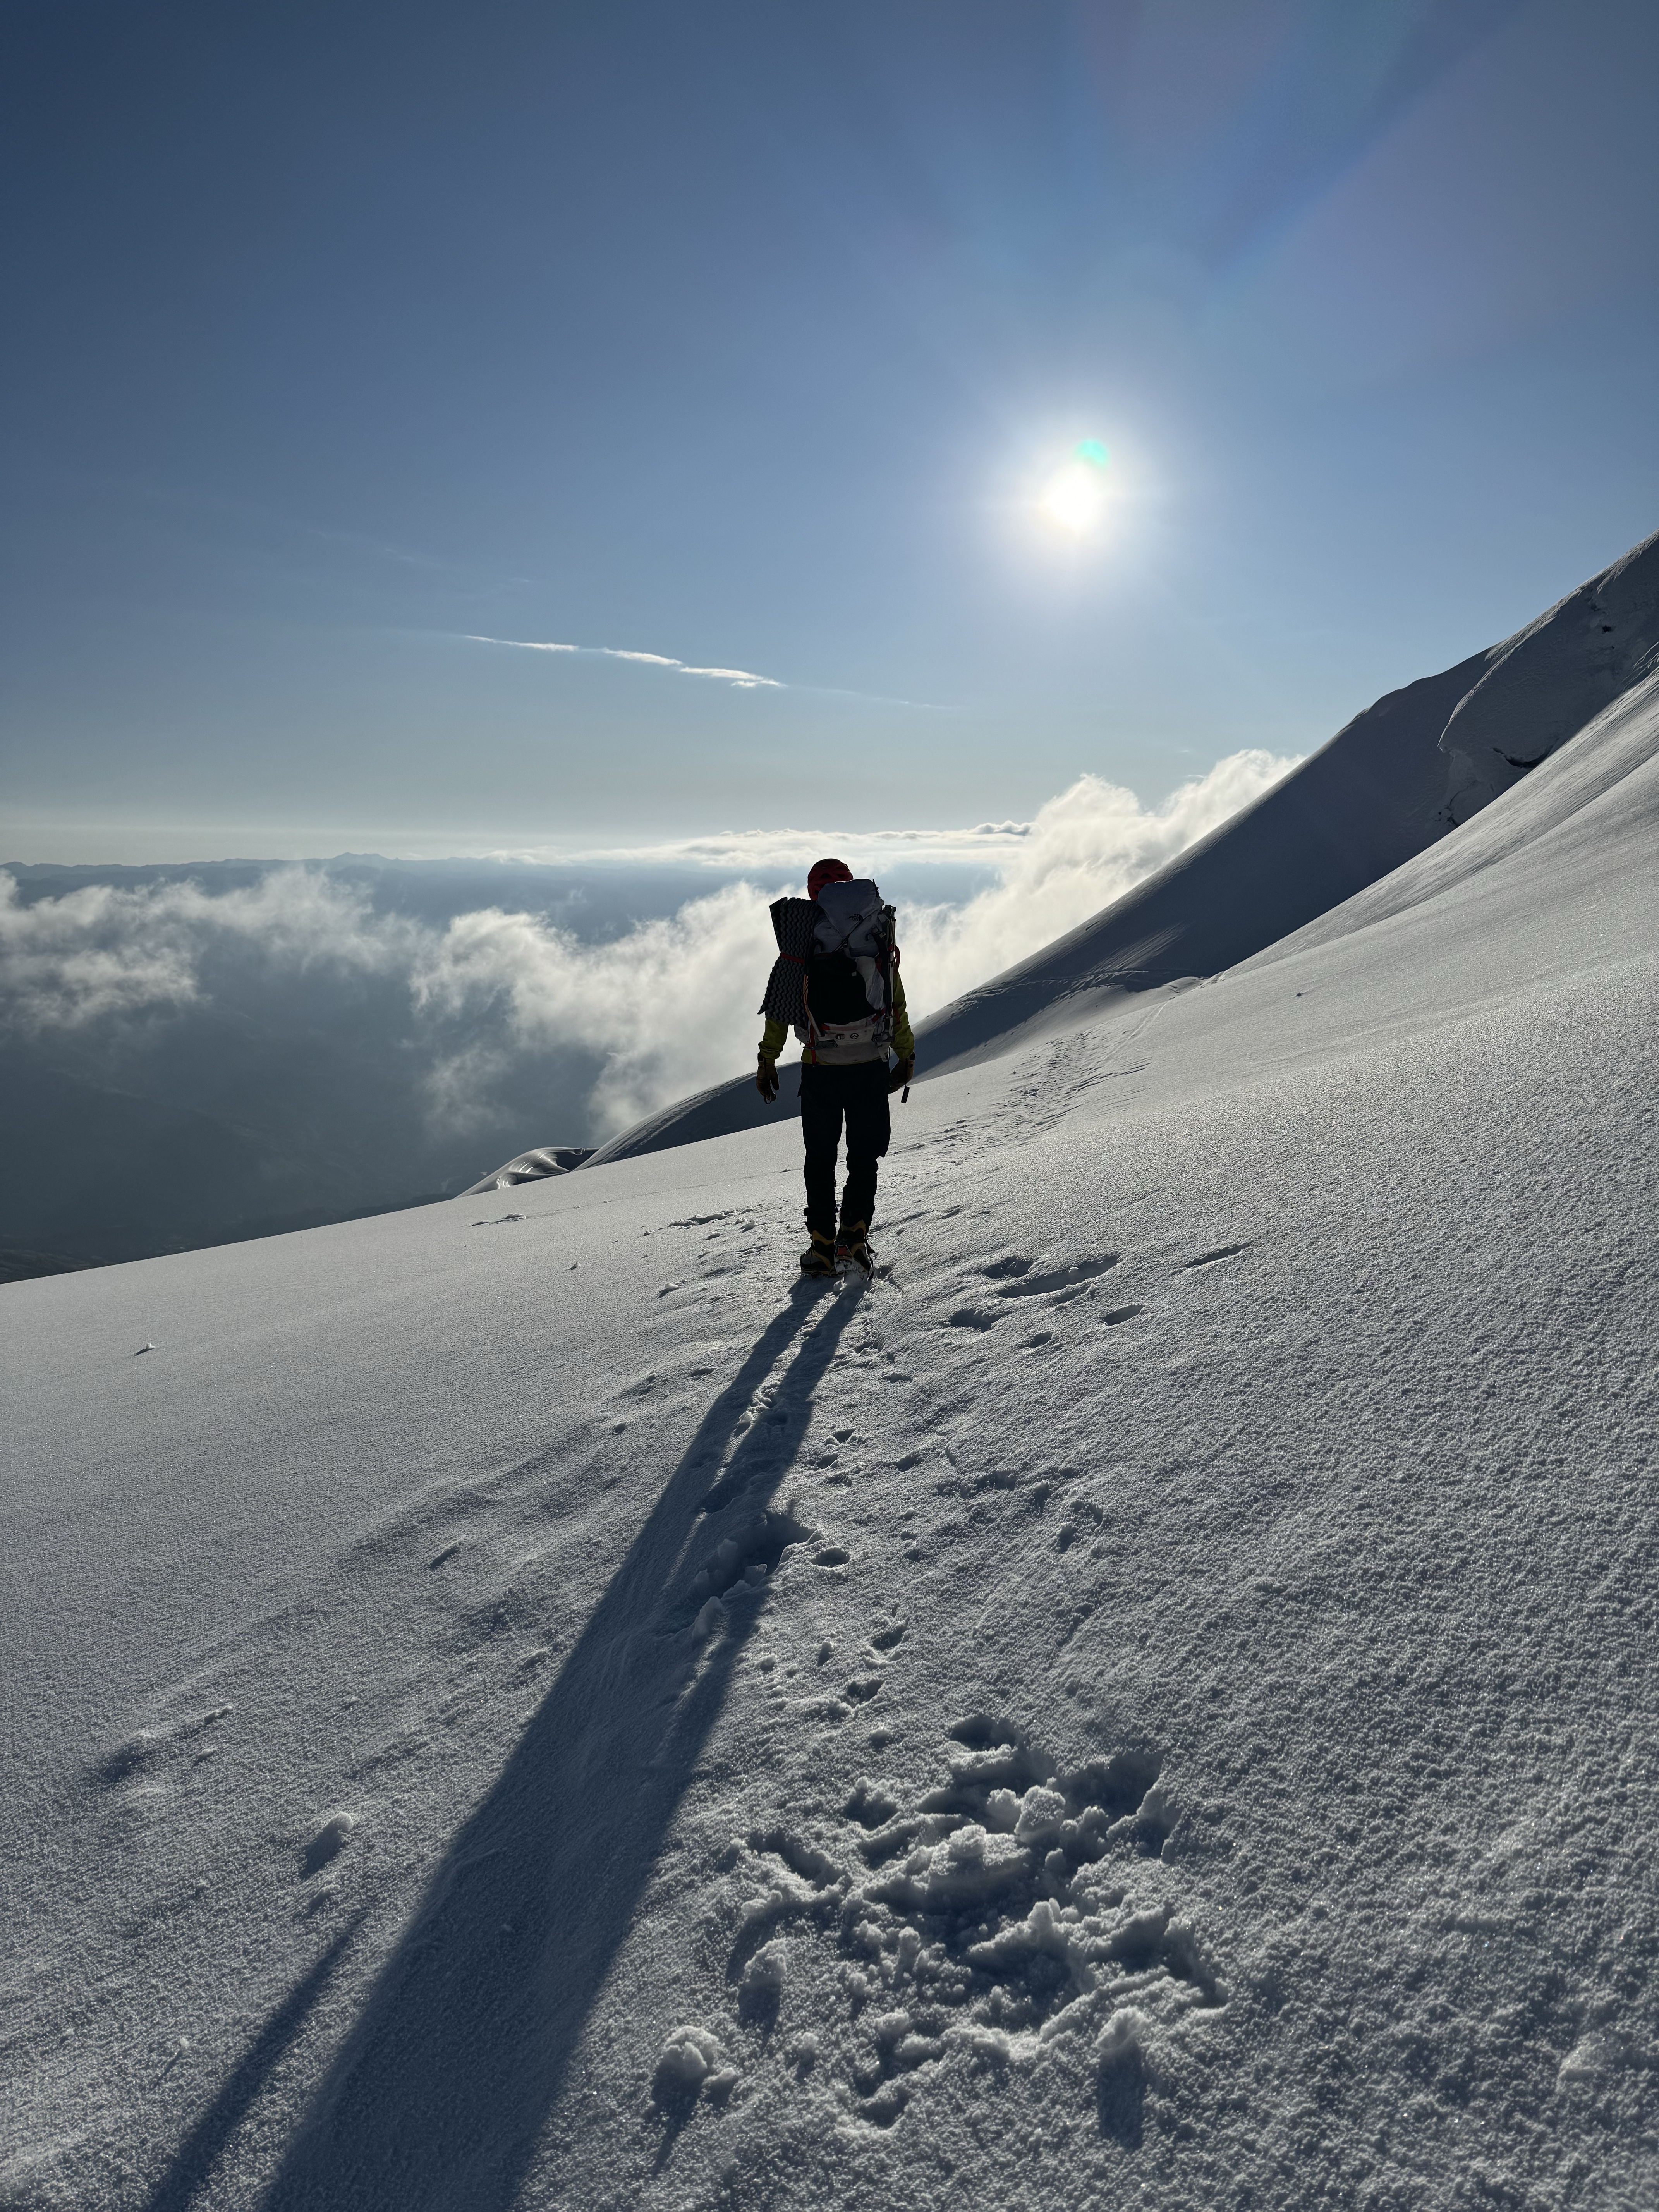
After a good rest we brave the summit, a rounded nothing, and find footsteps. Thank god. The traces of this morning’s guided groups will make it very easy for us to exit down the other side of the mountain, where we have never been. We take a few photos on the summit, aprovechandolo for what it’s worth, and walk down towards the col between Vallunaraju’s two peaks.
We bag the South peak, unnecessarily, it turns out, since the trail departs from the col. The view is great though, and we get back on the tourist trail with only minor grumbling. The walk out passes quickly, following the footsteps of others across the relatively gentle glacier. Although carrying our camp up and over the route was painful, we both appreciate how much simpler the terrain is on this side of the mountain. It was the right decision, in the end.
We reach the edge of the glacier a little before sunset. Calum is continuing to be sick, and wants to go down to the refugio so he can sleep lower and use their bathroom. Some bickering ensues, we get lost, tempers flare, but ultimately, we struggle down the trail back to the Llaca refuge, the light of my headlamp illuminating the shining green eyes of dozens of playful foxes, all around us. We arrive around 10 at night, and pitch our tent on a grassy platform next to the hut. After more than 18 hours of steady movement, uninterrupted sleep comes on quick and stays until morning.
Route History
This was supposed to be Calum’s “Acclimatization Climb”, an easy one to ease into the altitude and style of the area. We way overshot on the difficulty. So how did we mess up so badly?
We did do our homework, really. We read the guidebooks we had access to, to get the history of the route. You can see an interesting progression. In Yuraq Janka (1973), the route is described:
“1971 route. Q. Llaca approach. Climb E glacier and steep mixed rock and snow to col (ca 5600m) between Wallunaraju and Jangyaraju I. Climb N Ridge.”
In David Sharman’s “Climbs of the Cordillera Blanca of Peru” (1995), we get:
“From hut in Q. Llaca walk around P5120 and head left up a moraine crest, 2h. Go up and left towards a huge boulder, pass this on the right and climb mixed terraces to the col ca.5600m on N ridge leading to the Yangyarajus, 1h.
Climb N ridge with rock falling away to left and snow slopes to the right, 2h. Alternatively, cross NW face from SW slopes to N ridge col (1975). One day return from Quebrada Llaca.”
Brad Johnson gives us:
“Barring easy access to the north col is a 250m rock wall. A relatively easy snow ramp rises from left to right, up through the wall. To reach the ramp, climb 200m of snow gullies. Once at the bottom of the ramp, climb along its left side, next to the rock face. Sixty to seventy meters of easy snow and ice, with some rocky sections, gain the col. A few belays may be necessary. Watch for loose rock. Once on the col, descend 30m down the other side, to the flat glacier. “
Here is a video of a 2011 ascent — note the huge snow mushrooms and ice formations, which were completely nonexistent on our ascent.
Still, we knew things would have changed. We paid a visit to the Casa de Guias to inquire about current conditions. The normal route is good, yes we heard. But what about the North Ridge? Does anyone climb that? North Ridge? No… Not this season. Last year one team tried; that we know of. But sometimes people don’t report their climbs. And Calum spoke of being “called” to Vallunaraju. So we went to Google Earth, to see if we could find updated satellite imagery which might give us an idea of current condition.
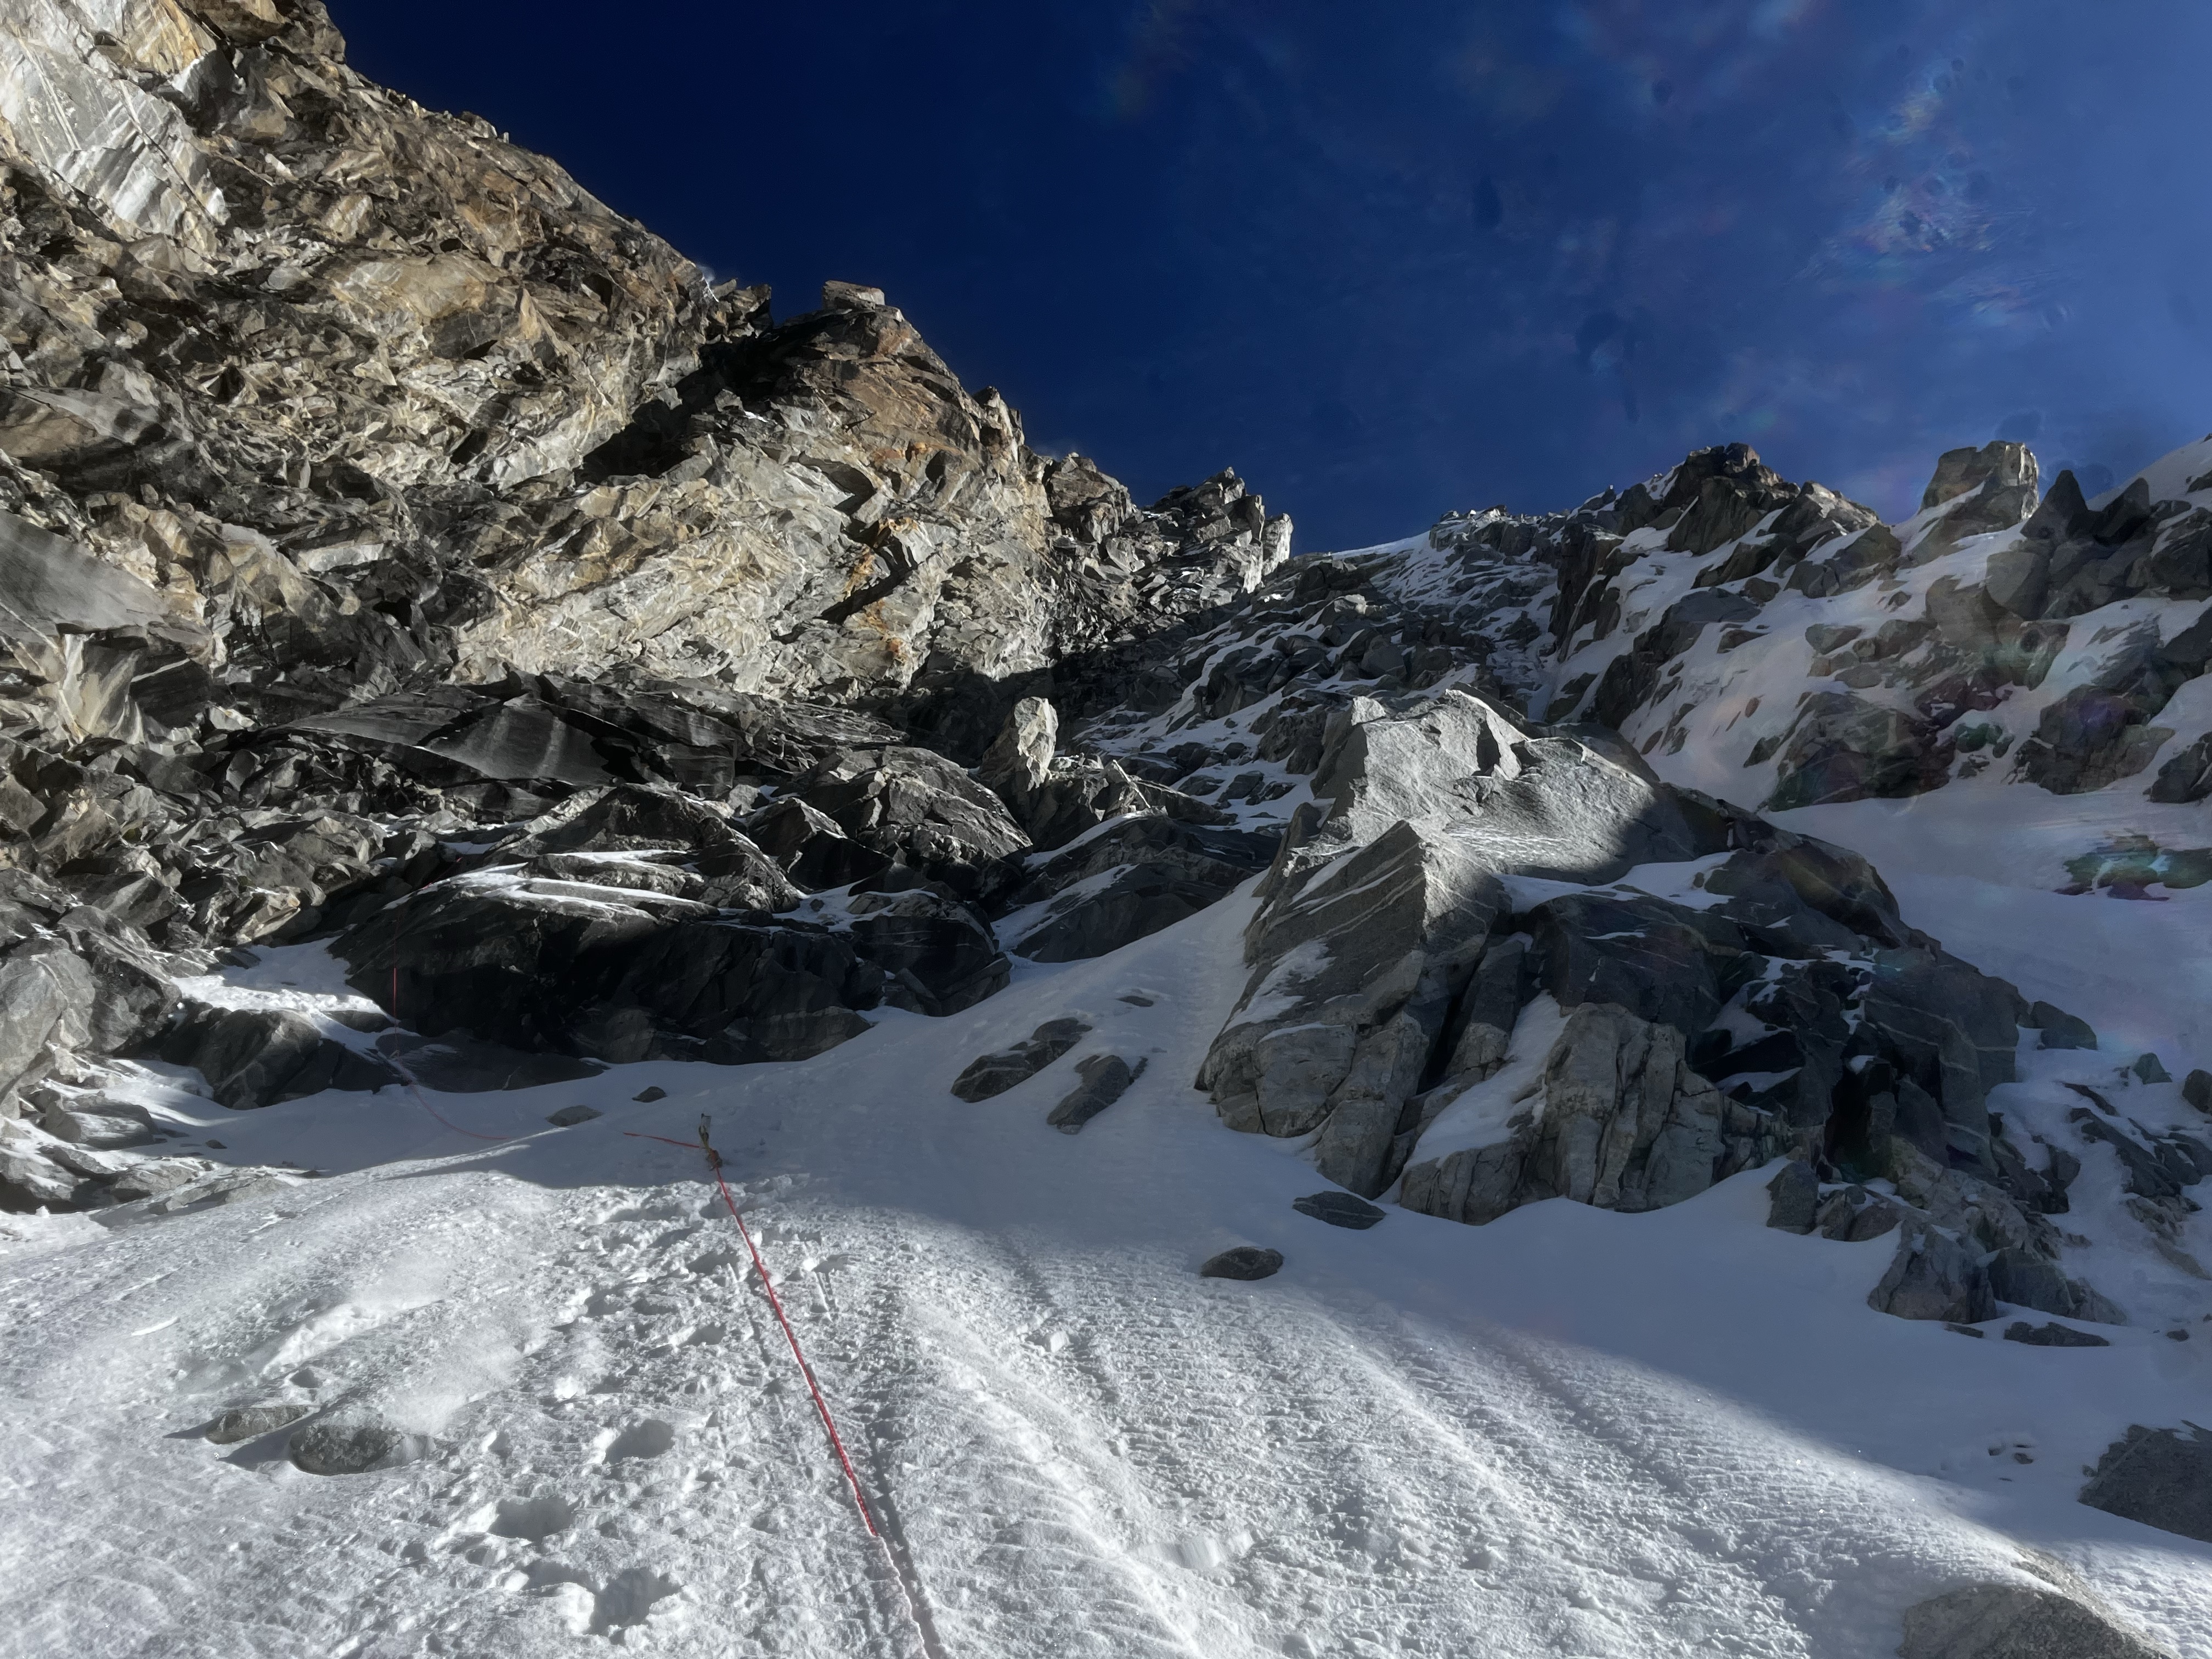
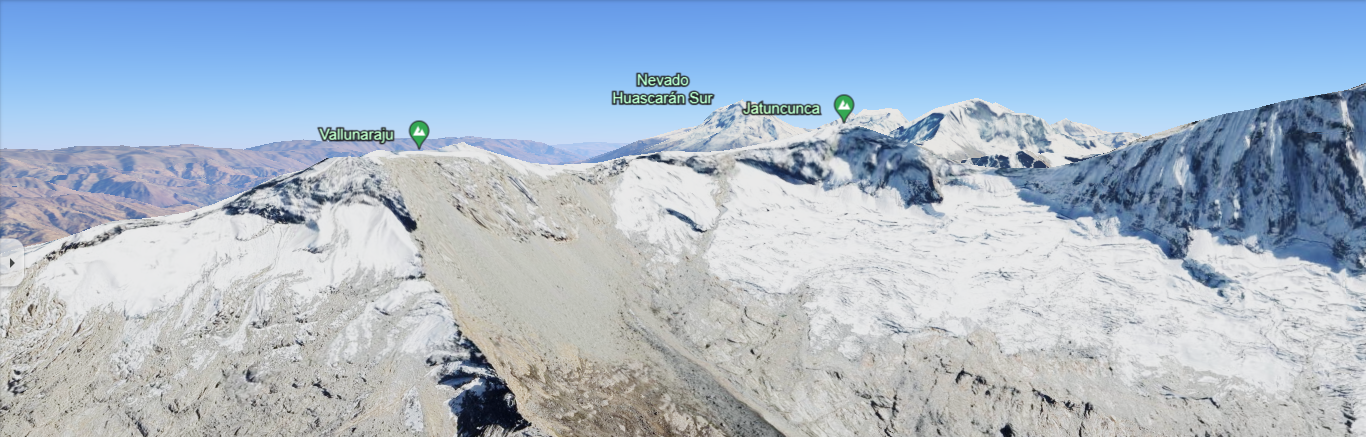
Google claims this data is from 2023, and it looked pretty good – just walk up that big apron on the left side of the glacier, right? Doesn’t look too steep or complex. Only problem is, this imagery has erased a 250-meter cliff. Here’s what that section of the mountain looks like in reality:
Vallunaraju North Ridge Conditions July 2024
The gully we ended up climbing (Left of center in this photo) doesn’t even appear in the satellite imagery. So, Google Earth, let’s say, is not a perfect tool for route planning.
Our Rack For Vallunaraju N Ridge
For climbing equipment, we brought:
Cams: .1, .3, .5, .75, and 1
Nuts: 3 DMM offsets
Pitons: two knifeblades
Ice Screws: x2 22cm
Pickets: 3 long pickets
Quickdraws: 3 Quickdraws
Alpine Draws: 3 Single Length (60cm), 2 double length (120cm) alpine draws
Rope: 1x 70-meter rope
This was about a perfect rack for the conditions we encountered.
The only thing we both agree we would have liked was one more picket. A stubby (10cm) or super-stubby (7cm) ice screw could be useful if the route was in slightly thicker condition. A thicker piton like a Lost Arrow also would have come in handy at a few points. But overall, a thin rack suffices because there was simply not much protection available in the cruxes. A second rope would make descent down the gully considerably easier, but adds a lot of weight. I think up and over is the best strategy.
Overall
On the hike out, Calum asked me: “Would you recommend that route to someone?” It was an interesting question – I found the route engaging and rewarding, but ultimately: no, I would not recommend it to someone. There were too many objective dangers and sections where we could have gotten seriously hurt. Sometimes that’s what alpine climbing is – but I find it hard to recommend this route, especially knowing that it will likely only get thinner and more dangerous as climate change continues to ravage the lower-elevation portions of the range.
Hike the standard route of Vallunaraju, (solo, in a day), or venture a little further into the valley and try your hand at the many routes on the face of Ocshapalca – they looked to be in great condition! Leave the North Ridge of Wallunaraju for the history books (or at least for a heavy snow year).
And always remember to thank your climbing partner!


Great write up! The climb sounds brutal, but way to keep it together and pull it off. MJB